Pages - Menu

Saturday 31 October 2009

Download Pickup Express (pc) Game and Play in Your PC


Pickup Express is a action game where you get the chance to simulate ownership of a courier company. The goal of Pickup Express is to pickup and deliver packages faster than your opponents.  This game was popular among us.

Features 3 different race mode. I like to play this game to the bomb  mode because it is very enjoyable. And today I am posting this because this is one of my favorite PC game.


This game is older one and it's size is only 50 MB. Many of the people are searching for download this game. I have found working download link for Pickup Express (pc).


* First, To download this game from Rapidshare click here
                     Downloads:


* After that click Free User and wait for a minute.

* Finally you can see a Download button.

* Click Download.

And of course you can use cheat to have more fun. Enter any of the following codes at the given screen to activate the cheat.

          Effect                                Screen          Cheat Code
  • All towns -                          Menus -         norrkoping
  • All cars -                             Menus -         toyota
  • All championships                Menus -        champion
  • All game modes -                Menus -         globalfun
  • All bonus cars -                   Menus -         prototype
  • All bonus towns -                Menus -         atlantis
  • Fuel -                                 Game play -    statoil
  • Alternate camera view -      Game play -    grandtheftauto
  • Map -                                Game play -    aftonbladet
  • Unknown -                        Game play -    showpoints
  • Unknown -                         Game play -   showlines 

You have to enter above code in correct screen. If you entered these code to wrong screen, the code will not work.

* The code toyota performs new car having perfect handling, great speed and as well as grips. 
* Type the code showlines to show the line of another player and know where they will go to their direction.
* While playing the game type grandtheftauto for great camera view.
* The code aftonbladet helps you to have map during the game, get earlier than your opponent.
* And try out other remaining cheat to get more effects.

If you know more cheats and about this game you can share with me:) Have Fun!


View This Article / Download>>

Monday 26 October 2009

Adding unique background image to the single widget

It is possible to setup background image to the single or an individual widget. Using this tricks, you can use different background images to each widget to your needs for your blogspot/blogger blog. You can see this demo in my blog's ads above.

To achieve this takes a little work. Each widget has a unique name. In this example, I have a widget, LinkList


First, logon to blogger.com


Go to Layout>>Edit Html

Search for your widget unique ID. I have "LinkList1" as the unique ID for my LinkList.

locked='false' title='link widget' type='LinkList'/>

So, my unique ID here is LinkList1.

Add this code between and or better keep it before


/* Sidebar Content */ 
#LinkList1{
background: #ffffff;
}
The above code will result the white background. You can define your own background by changing the hex colour code. And you must remember that LinkList1 is the unique CSS code for your widget.

Further if you want to add your own background image. Just make some twist as below:

#LinkList1{
background: #ffffff url(http://www.yoursite.com/image/image.jpg) no-repeat;
  }
These are all the magic because of the CSS code. You can make add other interactive effects on your widget and blog by using the proper combination of CSS codes.

View This Article / Download>>

Wednesday 21 October 2009

Hack your iPhone or iPod Touch with JailBreak

Hack your iPhone or iPod Touch with JailBreak.com.

Have you ever wanted to break free from Apple’s enclosed list of apps.? Well, by simply doing the following, you will be free at last to try out other third-party apps. on your iPhone or iPod Touch.

The hackers of our generation are getting stronger and more determined as ever, and after Apple’s new 1.1.1 update that rendered unlocked iPhones useless, hackers took it personal. Therefore a group of hackers including hdm/metasploit, rezn, dinopio, drudge, kroo, pumpkin, davidc, dunham, and NerveGas have put together the “One-Touch” instant jailbreak which works with the iPhone and the iPod Touch. Basically making your device’s full disk available for use and adding Installer.app to the device, giving you access to installing almost any third-party app. on your iPhone or iPod Touch.

It’s simple to use, just open up your Safari web browser on your iPhone or iPod Touch and visit JailBreakMe.com (make sure NOT to click on this link unless you want to hack your device now!!!), after visiting the site simply read the instructions provided, then scroll down and click on the “Install AppSnapp” button. You’ve just hacked your iPhone or iPod Touch, that’s it!!!
 
Additional Notes: When “jailbreaking” (hacking) your device, Safari will commonly disappear and you will be brought back to the home screen, once there give it a minute for the device to restart and make sure not to touch anything at this point. Once your iPhone or iPod Touch has restarted and you get the “Slide to Unlock” screen, go ahead and unlock it and you’ll find that a new icon (Installer.app) is available on your home screen.

Also sometimes your Safari web browser will hang/stall when you activate the hack. If this happens, just press the Home button for about 5 seconds until it returns you to the home screen, then try again. Usually it’s best to use WiFi rather than EDGE when jailbreaking your device.


Advanced User Note: If you want to add SSH access to your device, then you’ll have to install the BSD subsystem, Community Sources, and then install Open SSH (you might also have to upgrade the Installer.app for this to work properly). By adding SSH/SSHFS, you’ll be able to open Finder Windows which may come in handy since you will have the ability to drag and drop files on your iPhone or iPod Touch.

The hack worked perfectly fine for me, and it only took about a minute to set up. Now I can add almost any app. I want to my iPhone and my iPod Touch. Hope you have fun with your newly hacked device!!!

Source: http://anup-views.blogspot.com

View This Article / Download>>

Useful Gmail Hacks

Here is the useful Gmail hack for you.
  1.  Multiple Gmail accounts
Most of us own more than one gmail account , one of the most annoying aspects of dealing with it is the fact that you cannot have more than one opened at the same time. Luckily, Firefox has a plugin, called Gmail manager , it is an add-on for firefox that allows you to manage multiple Gmail accounts.


Just download plugin from this site and install.


2) Mail Fetcher
Mail Fetcher is very useful google feature , which can heck up to five other email accounts and download all that mail into your Gmail. Setting up Mail Fetcher is easy, just follow these steps:
-Click Settings at the top of any Gmail page, and open the Accounts tab.Click on the “Add another mail account link.”


-Enter the email address of the account to get mail from and click on the Next Step button.


-Set details for your new email account such as your password, POP server, port and label incoming messages


After this you’ll be able to retrieve mail from this account.
3) Bookmark any label, folder or message type
In this simple tip will see how to create one-click access to all your Gmail labels, Inbox, Sent Mail, Drafts…
Go to Labs category and enable Quick Links. Click on Save Changes


Select desired label, search or message and click Add Quick Link in the Quick Links box.


Type a recognizable name for the bookmark and click OK


4) Quick gmail hacks
-press “m” key to mute a conversation
-label:unread label:inbox show only unread message
-drop attachments directly into the attachment box with dragdropupload 1.6.8, firefox extension
-Ctrl+s save the current email as a draft
-Speed up gmail , just press F8 (turn off message pane)

View This Article / Download>>

Saturday 17 October 2009

How To Hack Any Flash Games

For any want-to-be Coder, hacking Flash Games is a good place to start.
Whether it be a Speedhack, or getting infinite life, it will probably be able to get you there.

1. Download Cheat Engine
Cheat Engine will allow you to find values and change them, which will be explained later
The current version is 5.5, so download that.


2. Find a flash game you want to hack.
For today, I'm going to hack, Endless Zombie Rampage and this one is for a test.


3. Start the game.
Now, it's recommended to pause the game, for a bit.
Most Flash Games will have a pause button on the "P" key, so press that and the game will most likely pause.

4. Open up Cheat Engine.
If you want to follow their tutorial, go ahead.
If you just want to continue, find the Computer Icon at the Top Left Corner.
It will be flashing green and red repeatedly.

5. Select the Process.
Now, to select the thing you want to hack, you have to select the process.
That's just a fancy name for program.
Scroll down, and you'll probably find your browser.
For Internet Explorer, it'll be something like iexplorer.exe
For Firefox, it'll be something like firefox.exe
I currently do not know the process name for Google Chrome or Safari, but just remember that the process name is similar to the browser name.

6. Once you've done that, go back to the game, we'll start with an unlimited ammo hack.
Look at the amount of ammo you currently have.
For Endless Zombie Rampage, you will start with 10 Ammo.
For flash games, all the values (10 in this example) must be multiplied by 8.
If the Value is large (Like 35273) feel free to use a calculator, built into the computer.

7. Search for your value.
For us, it'll be "80"

8. Most likely, a BUNCH of values will pop up, and changing all of them is annoying, and dangerous.

9. Unpause the game, and fire one bullet.
That will change the value to "72"

10. Enter "72" as the value and press "Next Scan"
That will search for a value of 72, within the values you already got.

11. If you end up with less than 20 values, double click all of them.

12. That will bring it to the bottom section.
Now click on the value of each one, and set it to a value you want.
For example, I'll choose "7200" for each one, and the gun will have 900 Bullets.

13. Freezing
You might also notice the 'Freeze Value" button.
What that does is "freeze" the value, meaning it can't change until you unfreeze it.
That can be a good thing or a bad thing depending on your situation.
If I froze the values at 7200, the gun will have 900 Bullets, and will never turn to 899, or 901, even if I fired or reloaded.

14. Enjoy your hacks!
For other things like health, do the exact same things as I showed you.
Like, Record Health once, get hit, search for the next value.

If you have questions feel free to ask!

View This Article / Download>>

Sunday 11 October 2009

Useful Keyboard Shortcuts for Ubuntu

I have discovered quite a number of keyboard shortcuts that are very useful, but seldom used by many. If you are looking for more keyboard shortcuts to add to your collection, I am sure you will be able to find some new tricks here.

1. Switch to the next/previous workspace

If you make use of the workspace very frequently, you can easily switch between different workspaces by pressing Ctrl + Alt + Left/Right Arrow. The Left key brings you to the previous workspace while the Right key brings you to the next adjacent. If you have enabled Compiz, you can even get it to show all the workspace by pressing Super + E on the keyboard.

2. Move the current window to another workspace

By pressing Shift+ Ctrl + Alt + Left/Right Arrow, you can easily move your current window to another workspace in the specified direction. This keyboard shortcut works very well with the one mentioned above. If you have the habit of opening many applications/windows when doing your work, but don’t like to see your desktop and menubar cluttered with all the application windows, you can use this shortcut key to move your applications to another workspace and get your desktop organized.

3. Show the desktop

Ctrl + Alt + D enables you to quickly minimize all windows and give focus to the desktop. When all windows are minimized, this shortcut can also maximize all the windows to their previous state.

4. Keyboard shortcut for the mouse right-click

In most applications, you can always right-click on the mouse to access the options menu. On the keyboard, you can simply press Shift + F10 to achieve this ‘right-click‘ effect

5. Restart session and recover from crashes

There are very few instances where Ubuntu will crash totally. But if it does, you can press Ctrl + Alt + Backspace to restart the session, and 90% of the time, it will recover from the crashes.

6. Lock the screen quickly

If you need to leave your workstation for a while, you can quickly lock up your screen by pressing Ctrl + Alt + L and prevent unauthorized access by others.

7. Switch between windows in the reverse direction

Alt + Tab is a common shortcut key that allow you to switch between open windows. But do you know that by including the ‘Shift‘ button, you can reverse the windows switching direction? This is useful when you press Alt + Tab too fast and passed the window that you want to switch to. Simply press down the ‘Shift‘ button to go back to the previous window in the switch cycle.

8. Move windows with arrow keys

Press Alt+F7 to activate the Move window function and use any arrows key (up, down, left, right) to move the window around the screen.

9. Show hidden files

Most of the time, you won’t need to view the hidden files in your home folder, but in the event that you need to, you can press Ctrl + H inside the Nautilus (the file manager for Ubuntu) to show all hidden files.

10. Show file properties without right-clicking the mouse

The conventional way to view a file/folder properties is to right-click the mouse and select ‘Properties‘. Now you can just press Alt + Enter to get the Properties window to appear.

If you know more please share with me via comment.

View This Article / Download>>

New! Free Sony Ericsson Theme By Hack Tutors-customized

Are you having a trouble of searching of new and customized theme of Sony Ericsson? Don’t worry I have just created a new and customized theme for Sony Ericsson. These all themes are you have seen but it is customized (updated) you can see the below screenshots.


Do you like it? Then,


Downloads:


 I have created this theme by using Theme Creator software. It's easy too easy to create the theme.

View This Article / Download>>

Saturday 10 October 2009

Free New! Sony Ericsson Theme By Hack Tutors-custumized

View This Article / Download>>

The best hacking tools collection

Here, i have collect some best hacking tools for you. That are listed below:

Nessus
The “Nessus” Project aims to provide to the internet community a free, powerful, up-to-date and easy to use remote security scanner for Linux, BSD, Solaris, and other flavors of Unix.

Ethereal
Ethereal is a free network protocol analyzer for Unix and Windows. Ethereal has several powerful features, including a rich display filter language and the ability to view the reconstructed stream of a TCP session.


Snort
Snort is an open source network intrusion detection system, capable of performing real-time traffic analysis and packet logging on IP networks.

Netcat
Netcat has been dubbed the network swiss army knife. It is a simple Unix utility which reads and writes data across network connections, using TCP or UDP protocol


TCPdump
TCPdump is the most used network sniffer/analyzer for UNIX. TCPTrace analyzes the dump file format generated by TCPdump and other applications.

Hping
Hping is a command-line oriented TCP/IP packet assembler/analyzer, kind of like the “ping” program (but with a lot of extensions).

DNSiff
DNSiff is a collection of tools for network auditing and penetration testing. dsniff, filesnarf, mailsnarf, msgsnarf, urlsnarf, and webspy passively monitor a network for interesting data (passwords, e-mail, files, etc.).

GFI LANguard
GFI LANguard Network Security Scanner (N.S.S.) automatically scans your entire network, IP by IP, and plays the devil’s advocate alerting you to security vulnerabilities.

Ettercap
>Ettercap is a multipurpose sniffer/interceptor/logger for switched LAN. It supports active and passive dissection of many protocols (even ciphered ones)and includes many feature for network and host analysis.

Nikto
Nikto is an Open Source (GPL) web server scanner which performs comprehensive tests against web servers for multiple items, including over 2500 potentially dangerous files/CGIs, versions on over 375 servers, and version specific problems on over 230 servers.

John the Ripper
John the Ripper is a fast password cracker, currently available for many flavors of Unix.

OpenSSH
OpenSSH is a FREE version of the SSH protocol suite of network connectivity tools, which encrypts all traffic (including passwords) to effectively eliminate eavesdropping, connection hijacking, and other network-level attacks.

TripWire
Tripwire is a tool that can be used for data and program integrity assurance.

Kismet
Kismet is an 802.11 wireless network sniffer – this is different from a normal network sniffer (such as Ethereal or tcpdump) because it separates and identifies different wireless networks in the area.

NetFilter
NetFilter and iptables are the framework inside the Linux 2.4.x kernel which enables packet filtering, network address translation (NAT) and other packetmangling.

IP Filter
IP Filter is a software package that can be used to provide network address translation (NAT) or firewall services.

pf
OpenBSD Packet Filter

fport
fport identifys all open TCP/IP and UDP ports and maps them to the owning application.

SAINT
SAINT network vulnerability assessment scanner detects vulnerabilities in your network’s security before they can be exploited.

OpenPGP
OpenPGP is a non-proprietary protocol for encrypting email using public key cryptography. It is based on PGP as originally developed by Phil Zimmermann.

Update: 

Metasploit
Metasploit provides useful information to people who perform penetration testing, IDS signature development, and exploit research. This project was created to provide information on exploit techniques and to create a useful resource for exploit developers and security professionals. The tools and information on this site are provided for legal security research and testing purposes only.

Fast-track
Fast-Track is a python based open source security tool aimed at helping penetration testers conduct highly advanced and time consuming attacks in a more methodical and automated way. Fast-Track is now included in Backtrack version 3 onwards under the Backtrack --> Penetration category. In this talk given at Shmoocon 2009, the author of Fast-Track Dave Kennedy runs us through a primer on the tool and demonstrates 7 different scenarios in which he breaks into systems using the Fast-Track tool. These scenarios include automated SQL injection, MSSQL brute forcing, Query string pwnage, Exploit rewrite, Destroying the Client and Autopwnage.


If you know more, share with me via comment:)

View This Article / Download>>

Hack Mobile Phones Using Bluetooth

Here is a software which can be used to hack any mobile phone through bluetooth network. Once connected to a another phone via bluetooth you can do the following:
1) Call from his phone. It includes all call functions like hold etc.
2) Read his messages
3) Read his contacts
4) Change profile

5) Play his ringtone even if phone is on silent
6) Play his songs(in his phone)
7) Restart the phone
8)Switch off the phone
9) Restore factory settings
10) Change ringing volume
Notes:
1.) When connecting devices use a code 0000
2.) At start of programming on smartphones do not forget to turn on bluetooth before start of the application
What else you want
Just go and downlaod it
download
enjoy!!! and here is a new version of software here

View This Article / Download>>

Launch Nokia Surge By AT&T

A few weeks back, we’ve spotted a video preview of what is believed to be the Nokia Surge, and rumors said that it will be available to AT&T by mid-July. Now, it is already official as this device has been recently announced by both Nokia and AT&T as a Symbian S60 handset.


This device is said to be an ideal device for those who always want to stay connected with their friends and loved ones, whether through e-mail, text, instant messaging, or social networking sites. It has 3G network, and it also has Flash support for viewing sites in HTML and for watching YouTube videos.

It is also pre-installed with Juice Caster application, where users are allowed to post messages, images, videos, and comments to popular websites like Facebook, Twitter, YouTube, and Flickr.

Coming from AT&T, you know this will have AT&T Navigation, AT&T Mobile Music, and AT&T Video Share. It also comes complete with a 2.4-inch QVGA display, 2-megapixel camera, Bluetooth, and a 2.5mm headset jack.

This Nokia Surge will be available at AT&T on July 19 for only $79.99 with a 2-year contract and after $50 rebate.

View This Article / Download>>

Friday 9 October 2009

Login to multiple accounts in google

Have you a multiple Google Accounts? And want to login with both of them on Gtalk on single computer? I found out the way to run multiple GTalkson a single computer. Here is a simple tricks for that, just follow the steps:

1.Create a shortcut to GTalk on your desktop (if you dont have currently).

2.Go to the properties of the shortcut. There in the target, you’ll see something like: “C:\Program Files\Google\Google Talk\googletalk.exe”


3.Add /nomutex to that target line. Then the line would be this:
“C:\Program Files\Google\Google Talk\googletalk.exe” /nomutex
4.“Apply” it and then click “Ok”.

5.Check out if it works, Enjoy Multi-GTalks and don't forget to comment to say it works:)

View This Article / Download>>

Thursday 8 October 2009

Cool facebook hack tricks

Facebook has grown popular over the years. As you probably know by now that we have discussed a simple javascript tricks. This is a cool and simple tricks of facebook i have found.

The Tricks of facebook:

All you have to do is copy the javascript code into the addressbar.

Menu Bar 
Just copy the code in the address bar then press enter to change the color of menu bar just like the picture below.


javascript:void(document.getElementById('fb_menubar').style.background='red');
You can change the color to your needs, just you have to replace the red text with your color name. 
Changing Title:


javascript:void(document.title="Facebook | eugines.info");
Chat Display: 
 
javascript:chatDisplay.tabs[321].tabXOnClick();
 
Chat Status:
javascript:presence.toggleTab('chat_status_control','chat_status_control_tab');
 
Buddylist: 
 
javascript:buddyList.toggleTab();
 
NOTE: It works only on Mozilla Firefox browser.
 

View This Article / Download>>

Wednesday 7 October 2009

Making invisible folder without any name

This trick will allow you to create files and folders without any name.

Just follow the following steps:
1.Select any file or folder.
2.Right click on it, press rename or simply press F2.
3.Press and hold the alt key. While holding the Alt key, type numbers 0160 from the numpad.
Note: Type the numbers 0160 from the numpad, that is, the numbers present on the right side of the keyboard. Don’t type the numbers which are present on top of the character keys.


4.Press Enter and the nameless file or folder will be created.
Reason: The file or folder that seems nameless is actually named with a single space.
But what if you want to create another nameless file or folder in the same directory ? For this you will have to rename the file with 2 spaces. Just follow these steps below:

1.Select file, press F2.
2.Hold alt key and type 0160 from the numpad.
3.Release the alt key. Now without doing anything else, again hold alt key and press 0160.
4.Press enter and you will have second nameless file in the same directory.
5.Repeat step 3 to create as many nameless files or folders in the same directory.
also you can hold alt+255
and right click the folder>properties>customize>Change Icon...
And find an blank icon...
Click Apply and ok
Then you dont have an icon and a name...
to find you can press ctrl+a.

View This Article / Download>>

Useful keyboard shortcuts on any Windows system

Getting used to using your keyboard exclusively and leaving your mouse behind will make you much more efficient at performing any task on any Windows system. Here is the list of that keyboard shortcut to make you easy.

Windows key + R = Run menu

This is usually followed by:
cmd = Command Prompt
iexplore + "web address" = Internet Explorer
compmgmt.msc = Computer Management

dhcpmgmt.msc = DHCP Management
dnsmgmt.msc = DNS Management
services.msc = Services
eventvwr = Event Viewer
dsa.msc = Active Directory Users and Computers
dssite.msc = Active Directory Sites and Services
Windows key + E = Explorer

ALT + Tab = Switch between windows

ALT, Space, X = Maximize window

CTRL + Shift + Esc = Task Manager

Windows key + Break = System properties

Windows key + F = Search

Windows key + D = Hide/Display all windows

CTRL + C = copy

CTRL + X = cut

CTRL + V = paste

Also don't forget about the "Right-click" key next to the right Windows key on your keyboard. Using the arrows and that key can get just about anything done once you've opened up any program.


Keyboard Shortcuts

[Alt] and [Esc] Switch between running applications

[Alt] and letter Select menu item by underlined letter

[Ctrl] and [Esc] Open Program Menu

[Ctrl] and [F4] Close active document or group windows (does not work with some applications)

[Alt] and [F4] Quit active application or close current window

[Alt] and [-] Open Control menu for active document

Ctrl] Lft., Rt. arrow Move cursor forward or back one word

Ctrl] Up, Down arrow Move cursor forward or back one paragraph

[F1] Open Help for active application

Windows+M Minimize all open windows

Shift+Windows+M Undo minimize all open windows

Windows+F1 Open Windows Help

Windows+Tab Cycle through the Taskbar buttons

Windows+Break Open the System Properties dialog box


acessability shortcuts

Right SHIFT for eight seconds........ Switch FilterKeys on and off.

Left ALT +left SHIFT +PRINT SCREEN....... Switch High Contrast on and off.

Left ALT +left SHIFT +NUM LOCK....... Switch MouseKeys on and off.

SHIFT....... five times Switch StickyKeys on and off.

NUM LOCK...... for five seconds Switch ToggleKeys on and off.

explorer shortcuts

END....... Display the bottom of the active window.

HOME....... Display the top of the active window.

NUM LOCK+ASTERISK....... on numeric keypad (*) Display all subfolders under the selected folder.

NUM LOCK+PLUS SIGN....... on numeric keypad (+) Display the contents of the selected folder.

NUM LOCK+MINUS SIGN....... on numeric keypad (-) Collapse the selected folder.

LEFT ARROW...... Collapse current selection if it's expanded, or select parent folder.

RIGHT ARROW....... Display current selection if it's collapsed, or select first subfolder.


Type the following commands in your Run Box (Windows Key + R) or Start Run

devmgmt.msc = Device Manager
msinfo32 = System Information
cleanmgr = Disk Cleanup
ntbackup = Backup or Restore Wizard (Windows Backup Utility)
mmc = Microsoft Management Console
excel = Microsoft Excel (If Installed)
msaccess = Microsoft Access (If Installed)
powerpnt = Microsoft PowerPoint (If Installed)
winword = Microsoft Word (If Installed)
frontpg = Microsoft FrontPage (If Installed)
notepad = Notepad
wordpad = WordPad
calc = Calculator
msmsgs = Windows Messenger
mspaint = Microsoft Paint
wmplayer = Windows Media Player
rstrui = System Restore
netscp6 = Netscape 6.x
netscp = Netscape 7.x
netscape = Netscape 4.x
waol = America Online
control = Opens the Control Panel
control printers = Opens the Printers Dialog

Hope this will helps you.

View This Article / Download>>

Tuesday 6 October 2009

Hacking Into a Windows XP Without Changing Password

Here is a far better way to get into Windows XP. It is easy and it does not reset the password. Hack into a computer running Windows XP without changing the password and find out all and any passwords on the machine (including admin accounts). You do not need access to any accounts to do this. Of course, do not do this on anyone elses computer without proper authorisation.

Steps to Hack into a Windows XP Computer without changing password:

1. Get physical access to the machine. Remember that it must have a CD or DVD drive.


2. Download DreamPackPL HERE.

3. Unzip the downloaded dpl.zip and you’ll get dpl.ISO.

4. Use any burning program that can burn ISO images.

5. After you have the disk, boot from the CD or DVD drive. You will see Windows 2000 Setup and it will load some files.

6. Press “R” to install DreamPackPL.

7. Press “C” to install DreamPackPL by using the recovery console.

8. Select the Windows installation that is currently on the computer (Normally is “1″ if you only have one Windows installed)

9. Backup your original sfcfiles.dll by typing:
ren C:\Windows\System32\sfcfiles.dll sfcfiles.lld” (without quotes)

10. Copy the hacked file from CD to system32 folder. Type:
copy D:\i386\pinball.ex_ C:\Windows\System32\sfcfiles.dll” (without quotes and assuming your CD drive is D:)

11. Type “exit”, take out disk and reboot.

12. In the password field, type “dreamon” (without quotes) and DreamPack menu will appear.

13. Click the top graphic on the DreamPack menu and you will get a menu popup. 

 Hack Windows Login Dreamon

14. Go to commands and enable the options and enable the god command.

Bypass and hack user account passwords

15. Type “god” in the password field to get in Windows.

You can also go to Passwords and select “Logon with wrong password and hash”. This option allows you to login with ANY password.

View This Article / Download>>

How to Bootable Vista / Windows 7 USB Flash Drive


win7 logoThis will walk through the steps to create a bootable USB flash drive for the purpose of installing a Vista or Windows 7 OS.  These instructions assume that you have a computer with Windows Vista installed on it.


Required:
  • USB Flash Drive (4GB+)
  • Microsoft OS Disk (Vista / Windows 7)
  • A computer running Vista / Windows 7
Step 1: Format the Drive
The steps here are to use the command line to format the disk properly using the diskpart utility. [Be warned: this will erase everything on your drive. Be careful.]
  1. Plug in your USB Flash Drive
  2. Open a command prompt as administrator (Right click on Start > All Programs > Accessories > Command Prompt and select “Run as administrator”
  3. Find the drive number of your USB Drive by typing the following into the Command Prompt window:
    diskpart
    list disk

    The number of your USB drive will listed. You’ll need this for the next step.  I’ll assume that the USB flash drive is disk 1.
  4. Format the drive by typing the next instructions into the same window. Replace the number “1” with the number of your disk below.
    select disk 1
    clean
    create partition primary
    select partition 1
    active
    format fs=NTFS
    assign
    exit
    When that is done you’ll have a formatted USB flash drive ready to be made bootable.
Step 2: Make the Drive Bootable
Next we’ll use the bootsect utility that comes on the Vista or Windows 7 disk to make the flash drive bootable.  In the same command window that you were using in Step 1:
  1. Insert your Windows Vista / 7 DVD into your drive.
  2. Change directory to the DVD’s boot directory where bootsect lives:
    d:
    cd d:\boot
  3. Use bootsect to set the USB as a bootable NTFS drive prepared for a Vista/7 image. I’m assuming that your USB flash drive has been labeled disk G:\ by the computer:
    bootsect /nt60 g:
  4. You can now close the command prompt window, we’re done here.
Step 3: Copy the installation DVD to the USB drive
The easiest way is to use Windows explorer to copy all of the files on your DVD on to the formatted flash drive.  After you’ve copied all of the files the disk you are ready to go.
Step 4: Set your BIOS to boot from USB
This is where you’re on your own since every computer is different. Most BIOS’s allow you to hit a key at boot and select a boot option.

View This Article / Download>>

Hack Tutor's Blogger roll and Link Exchange

Here is the lists of my favorite blogs. You can also list your blog here by contact me or via comment.


 Note: Everyone who wants to link exchange request to their blogs name, URL and address. First you have to add me and give me your site details.

Special For You: Those who wants to link exchange, you can put your link automatically in my sidebar by commenting more on my blog. But, you have to beat the topper score. You can see the top commentors  widget on my sidebar.

    View This Article / Download>>

    Monday 5 October 2009

    How to recover Windows Password

     Ophcrack is a free Windows password cracker based on rainbow tables. It is a very efficient implementation of rainbow tables done by the inventors of the method. It comes with a Graphical User Interface and runs on multiple platforms.
    Here are the 10 steps to successfully recover a lost Windows Password


    1. Download the iso image here or here
    2. Burn the iso image to a cd
    3. Reboot the computer with the cd in the drive to start the program on the CD
    4. Select ophcrack Graphic mode from the Menu that appears after the reboot
    5. The software will now automatically start scanning for password for all the users on the computer
    6. The password will be revealed for the users as it is cracked. 
    7. Close the ophcrack application, shutdown the pc and remove the cd
    8. Restart and load windows
    9. Enter the username and password on the login screen and you have recovered the password :)


    View This Article / Download>>

    Free Image Resizer Software Download

     FastStone Photo Resizer is an image converter/resizer intended to enable users to convert, rename, resize, crop, rotate, change color depth, add text and watermarks to image in a quick and easy batch mode. Drag and drop mouse operation is well supported. This is one of the best image resizer softwares.


    File Name : FSResizerSetup26.exe
    Category : Image, Photoes Resizer (Freeware)
    Developers: www.faststone.org
    Licence : FreewarePrice: Free or $0.

    Functions
    Resize Images : In Pixels, In Percentage and Based on one side.
    Rotate Image : Flip Horizontally, Flip Vertically or Rotate 90 ,180 angles
    Crop Image : In Pixels, In Paper Size or In Aspect Ratio
    Resize Canvas :
    Adjust Colour Depth or Colour Adjustments
    DPI
    Add Text or watermark to the image
    Add Borders
    and Files renaming


    You can download this software here   or if you want detail visit: http://www.faststone.org/FSResizerDetail.htm
    If you are looking for free but clean Image Resizer I think you should try FastStone Photo Resizer 2.6. If you want to download software of different versions visit: http://www.faststone.org/download.htm

    View This Article / Download>>

    Create invisible password protected drive to Hide your data

    There are lots of software which can hide data on your disk or password protect them. But after some time it becomes difficult to manage all your hidden data. So here we have a freeware which can do this for you.

    Secret disk is a small utility to create encrypted virtual drive on your PC. you can also make this drive invisible. It provides the fastest and easiest way to secure your important data. You can switch your drive from invisible to visible only with a single mouse click.

    secret-disk
    After installing secret disk set your master password which will be used to lock/unlock your secret drive. A new drive will be created in your “My computer” in which you can store your secret data. And after storing your data you can make that drive invisible using this software.

    Download Secret Disk(2 MB)

    a circus freak has a 3rd leg

    View This Article / Download>>

    Sunday 4 October 2009

    Hack Symbian OS

    his hack tutorial will allow you to install unsigned applications in your any symbian 9.2 OS featured Cell phone. It will allow you to give applications full permissions. Basically, it will give you Freedom from the firmware. we will not be responsible for anything happening to your phone, though Nothing bad should happen anyway. This hack has been confirmed on the N95, N95 8GB, N82 and some others. If you perform this hack, please tell me your phone model


    Tools you'll need:


    Download ActivePython FROM HERE, install it.

    Download and install PySerial from FROM HERE.

    Download and install AppTRK (to your phone) FROMHERE.

    Download Hack Perms FROM HERE.


    Download the S60_3_1_Prof_v1_62.zip file  FROM HERE 


    After downloading and installing the above softwares, connect your phone to your PC via USB in PC Suite mode.


    Go to Control Panel>System>Hardware>Device Manager>Ports OR Control Panel>Hardware and Sound>Device Manager>Ports(Windows Vista ).


    Once you're there, look for your phone, in my case it's called 'Nokia GSM Phone USB (COM3)'. Make a note of the number after COM, you'll need it later.


    Open AppTRK on your phone and press cancel when it trys to connect via bluetooth. Go to options>settings>connection and change it to USB. Go back and press options then connect. This is what you should see:


    Now open up the Hack Perm python file in notepad on your PC, press CTRL+F on your PC and search for "ser =" (Without quotes). Once you're there change the 5 that's in the brackets to the 1 less than the number that followed COM in the step above.


    For example, if your number was 6, you would change the number in the brackets to 5 and if your number was 5, you would change the number in the brackets to 4. Once you've done that, save the python file. Please don't be mistaken, you must choose save not SAVE AS.


    Once you have done this, just double click the Hack Perms file and wait for about 5 seconds, during this time, you should see this, notice the "!!!!!!!!!!!candidate!!!!!!!!!!!", this shows you've been successful:


    This hack will be temporary until you follow these steps


    Go to your applications folder and open it, it should be called profiler.
    Go to: Options>Profiler>Start
    When you see 'Status:Sampling' at the top of the application's screen go to Options>Profiler>Stop.
    Now wait for about 1 second for it to show 'Status:Finished' and then exit the application.
    Download this file from HERE, rename it to CProfDriver_SISX.ldd and paste it into C:\SYS\BIN on your phone by using X Plore or another file browser to replace the existing file with this one.


    Source: YouCanHack.blogspot.com

    View This Article / Download>>

    How to Disable Balloon Tips!

    Did you ever have to turn your firewall off for some reason, or change your virus protection to something other than windows defender (or any other virus protection that Windows actually recognizes)? Then if on Vista, you must keep getting those annoying ass balloon tips in the bottom right hand corner of your screen. There's actually a way to turn that OFF, which is why I decided to make this quick guide to a very simple fix for it. I figured that this would help people who were as pissed off at it as I was.


    Step 1.

    Press the Windows key (the one that looks like it has a flag on it), and press the R key while holding it down.

    Step 2.

    Type regedit in run and click OK.


    Step 3.

    In the left click HKEY_CURRENT_USER, then Software, then Microsoft, then Windows, then CurrentVersion, then Explorer, then Advanced.

    Step 4.

    Now right click somewhere in the white space, click new, click DWORD (32-bit) Value three times, and give them the following names: FolderContentsInfoTip, StartButtonBalloonTip, and EnableBalloonTips. DO NOT just click new, click DWORD (32-bit) Value three times, and click off somewhere thinking that you can rename it later.

    If you see this:

    You fucked up. Delete those and name them one at a time as you create them!


    Step 5.

    Even though the Data value should be 0x00000000 (0) by default, do the following if your computer got raped by gophers and the values are something other than that.

    Right click 'FolderContentsInfoTip' and click Modify; now enter the following and click OK:

    Right click 'StartButtonBalloonTip' and click Modify; now enter the following and click OK:

    Right click 'EnableBalloonTips' and click Modify; now enter the following and click OK:


    So when done, you should see this:


    Step 5.

    That's it, just reset and enjoy your peace.

    View This Article / Download>>

    How To Add Flash to your iPod

    Here is a detailed step by step installation guide of iMobileCinema.
    Step 1. Launch Cydia
    iMobileCinema can be installed only on jailbroken iPhone/iPod touch currently.


    Step 2. Add Source

    Add the source iMobileCinema - Installation Guide in Cydia.


    Step 3. Locate iMobileCinema

    Locate iMobileCinema (for 2.x) in our source.


    Step 4. Install


    Step 5. Wait to finish


    Done! You can watch Flash videos in Safari of iPhone/iPod touch now.


    If a unplayable icon shows, that means the site is not supported by iMobileCinema currently.
    If nothing but a blue Lego brick icon shows, you need to enable the Plug-Ins in Settings.


    You may need to restart Safari (by holding Home button) or restart iPhone.

    View This Article / Download>>

    Making your frist D3D hack

    Hi guys, Today I am teach you how to make a D3D.You should have these following things to make D3D.

    •  Microsoft Visual C++ 6


    • DirectX 9.0 SDK Update - (Summer 2004)


    • D3D Starter Kit 3B Download

     After you have download and installed C++ 6 and D3D SDK
    you can now setup C++ to use the SDK lib files.

    Ok so, open up C++ 6
    To to tools>options>Directories
    Then on the right select choose Show directories for Include files
    Add the Microsoft Directx 9.0 SDK include folder
    Then it should look like this:


    After you have done that, on the left again choose
    Show directories for Lib files and choose the
    Microsoft Directx 9.0 SDK lib folder.
    Now press ok!
    Your done setting up C++ 6!

    Now we must setup the starter kit so we can use it!
    Extract the files in the Starter kit, and go into the D3D9 folder.
    It should look like this:


    Now go into the old_workspace folder, and copy the 2 files into the D3D9 folder.

    After that, go in C++ 6 and click file>open workspace
    and open TatniumD3D.dsw

    Once you have done those you can make a hack! Yeay!
    I will now show you how to draw a crosshair


    Put this in globals: (right under "#define D3DHOOK_TEXTURES")

    Code:

    float ScreenCenterX = 0.0f;
    float ScreenCenterY = 0.0f;
    bool crosshair = false;
    D3DCOLOR color = D3DCOLOR_XRGB( 200, 0, 0 ); // Add your own values if you want....  

    Now press Ctrl + F and search for SetViewport
    Under

    HRESULT APIENTRY hkIDirect3DDevice9::SetViewport(CONST D3DVIEWPORT9 *pViewport)
    {

    Put:

    ScreenCenterX = ( float )pViewport->Width / 2;
    ScreenCenterY = ( float )pViewport->Height / 2;

    So now it will look like this:

    HRESULT APIENTRY hkIDirect3DDevice9::SetViewport(CONST D3DVIEWPORT9 *pViewport)
    {
    ScreenCenterX = ( float )pViewport->Width / 2;
    ScreenCenterY = ( float )pViewport->Height / 2;
    return m_pD3Ddev->SetViewport(pViewport);
    }

    Now Press Ctrl + F again and search for EndScene 

    Put:

    if(crosshair)
    {
    D3DRECT rec2 = {ScreenCenterX-20, ScreenCenterY, ScreenCenterX+ 20, ScreenCenterY+2};
    D3DRECT rec3 = {ScreenCenterX, ScreenCenterY-20, ScreenCenterX+ 2,ScreenCenterY+20};
    m_pD3Ddev->Clear(1, &rec2, D3DCLEAR_TARGET,color, 0, 0);
    m_pD3Ddev->Clear(1, &rec3, D3DCLEAR_TARGET,color, 0, 0);
    }

    In EndScene

    Now its time for hotkeys!
    I'ma now show how to do menus cause their confusing :S

    Now you can put hotkeys in either beginscene or endscene!
    They both work :D

    A hotkey will look like this:

    if( GetAsyncKeyState(hotkeyhere) & 1 )
    {
    commandgosehere = !commandgosehere;
    }

    But it this case we want it like this:

    if( GetAsyncKeyState( VK_Insert ) & 1 )
    {
    crosshair = !crosshair;
    }

    The hotkey will be insert!
    Now build it then batch build it!

    And then your done!
    Take the dll you build and inject it to a D3D9 game! 


    View This Article / Download>>

    Saturday 3 October 2009

    How to Overcklock Your Graphic Card.

    You will get about 10-15% more performance for free.
    The only bad thing is that the temperature will increase and life of the hardware will decrease.

    I know this work whit NVIDIA but I think it works whit ATI to.

    Start to download RivaTuner, Furmark and GPU-Z. Install the programs and follow the instructions.

    Download GPU-Z: http://www.techpowerup.com/gpuz/
    Download Fur mark: http://www.ozone3d.net/benchmarks/fur/
    Download Riva Tuner: http://www.guru3d.com/index.php?page=rivatuner

    Start Riva Tuner. At the moment Riva tuner doesn't support the latest NVIDIA drivers.
    This is done under the tab "Power User". Navigate there and expand the list "System". A bit down in this list, a parameter called "Force Driver Version". This value will be changed to 18585, ie the driver's version number. Save the settings, click "OK". Restart the program.
    Always keep an eye for the new version of Riva Tuner.

    Although the program will still say that the drivers are not supported, but we can access the overclocking menu. Click on the small arrow to the right under Driver Settings. In the four icons that pup up you will choose the one to the left, that looks like an graphic card.

    Click on "detect now" in the window.

    The upper lever controls graphics processor (GPU) clock frequency, the middle takes care of the stream processors and the bottom changes the memory clock. Move the slider to the right to increase the frequency.

    Now is the time to trim the clock frequencies. Start Fur mark and GPU-Z. The first program is used to check if the clock frequency is working and what temperature the graphics card reaches, and the other to see which clock frequencies used at the moment.

    With Fur mark and GPU-Z running, we return to over clocking tab in Riva Tuner and start raising the clock frequencies. It is easiest to start with only the GPU and then take care of the stream processors and memory by hand. Raise the clock gradually by 10-15 MHz at a time. Fur mark ensures that the graphics card is under full load, which will appear when the temperatures shoot away.

    Depending on the graphics card is used; sooner or later encounter a limit where graphics error occurs. This is usually seen in Fur mark as small dots or nails projecting from the hairy ball. When this occurs, lower the clock rate slightly and try again.

    When you know the clock frequency GPU is capable of, just apply the same method on the stream processors and graphics memory, with small incremental increases in time. Should your computer freeze because of too high over clocking, just reboot, then the default settings will be loaded.

    Let Fur mark runing a moment to make sure that the clock frequencies are stable. Between 45 minutes and two hours will do it. When you are satisfied, it is possible to let the Riva Tuner apply the settings each time Windows boots. To do this, tick the option "Apply Over clocking at Windows startup" in the over clocking menu.

    Now you are done. You can see how much the performance have increased by running 3Dmark before and after.

    View This Article / Download>>

    Automatic Post Summaries Hack for Blogger with Thumbnails

    This hack will automatically create post summaries with thumbnails.. you needn't need to add any extra code in every blogpost that you make..These summaries will be displayed on all pages other than the post page. You can view demo in this blog.

    First of all Edit your blogger template
    Find this code:


    and replace it with


    And you are done.. now you should have the post summaries on your homepage,search results,archive and label pages..is it working don't forget to tell me.

    View This Article / Download>>

    Friday 2 October 2009

    Add high paying ads in your website or blog

    Just good placement of ads and SEO optomization is not enough to increase your adsense revenue. You must also have good and high paying advertisements offered in your website or blog. To have high paying ads you must have high paying keywords. First you must remove the low paying adsense ads. To remove the low paying adsense ads from your account,follow the steps below.

    1.First go to www.adsblacklist.com .

    2.Then Signup and login to your account.

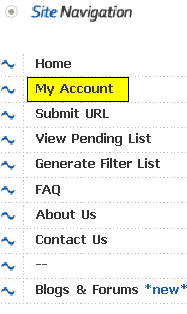
    4.Now Click on My Account(see in the image below).


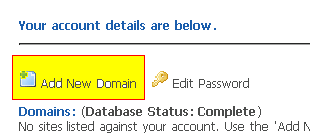
    5.Now click on 'Add New Domain'


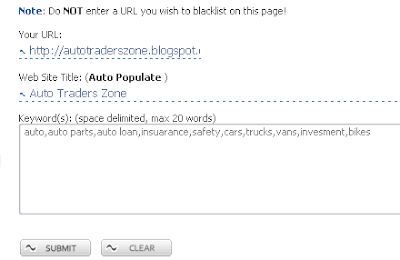
    4.Submit your URL,TITLE and Keywords.Look at the example below.


    5.Now go to Generate Filter List.


    6.Drag and drop your domain name into 'Keywords from selected domains:' box.Then you can see keywords,you give in step 4.

    7.Now select 'MFA' and 'LCPC'.


    8.Now click on Submit.

    9.They will give you lowpaying ads urls.copy these urls.

    10.Now login to your Google Adsense Account.

    11.Click AdSense Setup.


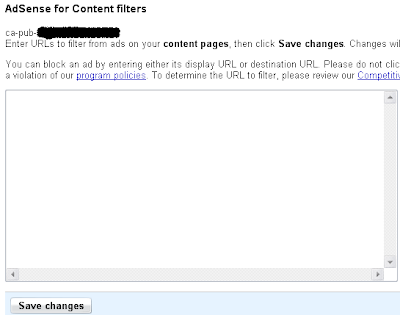
    12.Go to Competitive Ad Filter category.


    13.Paste lowpaying ads urls into the box and click save changes.


    14.Now google will not display low paying ads in your site. 
    Happy earning!!!

    View This Article / Download>>