Pages - Menu

Showing posts with label Blogger Widgets. Show all posts

Friday, 8 July 2011

Auto Sliding Featured Post Widget for Blogger

Last time we introduced JQuery featured post widget for blogger. But it got some problems like overlapping the posts and code errors. But now, unlike previous widget, here I'm with new finely working featured post widget for Blogger blogs.


This featured post widget is more advanced in comparison to previous one. Take a look at the working demo of this featured post widget at first.

Demo

If you like it here is how to add it in your Blogger blog.

Step 1:
Go to Blogger > Dashboard > Edit HTML.

Step 2:
Find (Ctrl + F) the tag   and just below paste the following code:


  • 1

  •      
  • 2

  •      
  • 3

  •    


Now, replace blue color URL with your post URL. Replace red color URL with your post's image URL. Similarly, replace green color with your post title and pink text with short post description.

Save the widget.

Step 4:
Pace the widget above the 'Blog Post' as shown below:
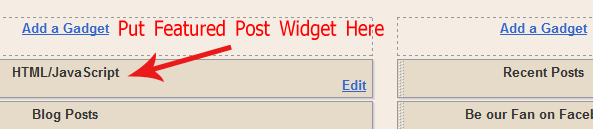

Finally you are done! View your blog if it is comfortable or not.

Show me your work via comment below and I will include your blog as demo working in this post.

View This Article / Download>>

Monday, 13 September 2010

Adsense Revenue Sharing Widget For Blogger Blogs

You might have seen Adsense revenue sharing in many popular WordPress blogs. But you also loved to add revenue sharing widget on your blogger blog. Blogger support for multiple author as in WordPress. To share a love and receive many posts from other author, you can embed Revenue Sharing Widget on your Blogger BlogSpot blog!

Revenue Sharing Blogger Widget

Using this widget can help you if you have multiple authors or writers. Let the other author gets benefits while writing on your blog.


Why It is Important?

There may be separate Google Adsense account with each authors and writers of your blogger blog. In each post that they write, there appears Google ads of their own. So, your author can easily get benefits whenever they write on your blog. They will get more inspiration that they can earn more from your blog!

Lets see the tutorial how to add this widget on your blog.

Sign in to Blogger.com and Go to Design > Edit HTML.

Check the 'Expand widget Template' box.

Find the following code in your template:


Now, paste the following code just above


PASTE THE AD CODE OF Author_1 HERE


PASTE THE AD CODE OF Author_2 HERE


PASTE THE AD CODE OF Author_3 HERE


It may not work when you directly Copy/Paste the code from Adsense. Encode the adsense code from here. Make sure that you have place the right code as shown below:


Replace Replace the red color text with your author adsense code. And Replace blue color text with the NAME of the author (You've chosen the name when you register). The author names must not be different, it should be unique. Place the author name when they have chosen when they registered the blogger account.

It can be found on the profile editing page.


Finally, save your template. Now your writer can get fully monetized post!

Not only with Google Adsense even you can use this trick with other ad service if your author use it. It is your choice to choose the banner size. I recommend to place square banner. It is best visible on the blog posts.

Now your blog is Adsense Revenue Sharing Blog with multiple authors where each and every authors can get benefits whenever they write on your blog. Enjoy blogging with blogger!

Let me know if you have used this trick on your blog.

View This Article / Download>>

Saturday, 11 September 2010

Stylish JQuery Featured Post Widget for Blogger

Featured Post widget is important to add the most interesting content of your blog. By adding featured post widget, you can emphasize the most popular content and show it to your readers. You may have seen these kinds of widget in similar WordPress blogs.


Today, we'll learn how to add it into Blogpsot Blogs. Earlier, I created Platinum Blogger Template. From the most of the template users, I received the comments that Featured Post widget is not present there. So considering this, I am writing the separate tutorial which we will start now!

First of all view the Demo here.

Note: Platinum Blogger Template users don't have to follow the Step1, Step2, Step3, Step4 and Step5. So you can directly jump to Step 6.

Updated: All code has been updated. Please re follow the instructions those who have installed this widget.

Step 1. As general, Log on to your Blogger account and go to Design > Edit HTML.

Step 2. Find the following code in your Template:

]]>
Step 3. Just above  ]]> tag, add the following CSS codes:

#featured{
width:336px;
padding-right:250px;
position:relative;
height:250px;
background:#fff;
border:5px solid #ccc;
}
#featured ul.ui-tabs-nav{
    position:absolute;
    top:0; left:336px;
    list-style:none;
    padding:0; margin:0;
    width:250px;
}
#featured ul.ui-tabs-nav li{
    padding:1px 0; padding-left:13px;
    font-size:12px;
    color:#666;
}
#featured ul.ui-tabs-nav li span{
    font-size:11px; font-family:Verdana;
    line-height:18px;
}

#featured .ui-tabs-panel{
    width:336px; height:250px;
    background:#999; position:relative;
        overflow:hidden;
}
#featured .ui-tabs-hide{
    display:none;
}

#featured li.ui-tabs-nav-item a{/*On Hover Style*/
    display:block;
    height:60px;
    color:#333;  background:#fff;
    line-height:20px;
    outline:none;
}
#featured li.ui-tabs-nav-item a:hover{
    background:#f2f2f2;
}
#featured li.ui-tabs-selected{ /*Selected tab style*/
    background:url('https://blogger.googleusercontent.com/img/b/R29vZ2xl/AVvXsEjwZL6E0NLXMhPfYkwKXHuU7A2hVAKg-hZdlwq1ZAoNLJ2jkkCmj_2RvBxLhf35aUvL8Y_Xi_iXJX8ZPDB9xgNhKjLiQ75WV5_59Btyv1WhDeAB7S00f0BXD0JL9-90DHGJx5NVpJNunlE/s1600/selected-item.gif') top left no-repeat;
}
#featured ul.ui-tabs-nav li.ui-tabs-selected a{
    background:#ccc;
}

#featured ul.ui-tabs-nav li img{
    float:left; margin:2px 5px;
    background:#fff;
    padding:2px;
    border:1px solid #eee;
}
#featured .ui-tabs-panel .info{
    position:absolute;
    top:180px; left:0;
    height:70px; width: 400px;
    background: url('https://blogger.googleusercontent.com/img/b/R29vZ2xl/AVvXsEhYGPtXxqF6XCWdx3J75Rh92tIGYqXGTFyxA4knBy-P9f6JeulzCN6nao8c3-x5DgYflkMS2GcI1YJDC1FEvySvh5wtbPwrN5VioSrzZiTdGUeJNj8ZSNnqfhv-RZVGjeJE6T-iqMS0P7s/s1600/transparent-bg.png');
}
#featured .info h2{
    font-size:18px; font-family:Georgia, serif;
    color:#fff; padding:5px; margin:0;
    overflow:hidden;
}
#featured .info p{
    margin:0 5px;
    font-family:Verdana; font-size:11px;
    line-height:15px; color:#f0f0f0;
}
#featured .info a{
    text-decoration:none;
    color:#fff;
}
#featured .info a:hover{
    text-decoration:underline;
}

.ui-tabs-nav-item img {
width:45px;
height:45px;
}

Step 4. Now, add the following JavaScript code above the tag:


Step 5. Save the Template.

Step 6. Again, Head out to Design > Page Element > Add a Gadget > HTML JavaScript. Add the following code into the box:


These codes are little bit confusing. So, you have to edit these codes carefully. Here is the customizations:

Replace fragment-1, fragment-2, fragment-3 and fragment-4 with your post URL. There is two link in the code but you have to place same URL. For example: There is two fragment-1. So, replace these two fragment-1 with same post URL.

Red color code is for image URL. Do same as you have done for the Links above. There is two image URL. So replace Image URL with your own. For example, replace both Image URL of Link-1 with your own. Note: the both Image URL must be same.

The text with Pink color is the title of each post. So, replace all of the Pink color text with the title of your post.

The text with Green color is the summary of the post. Replace these text with short summary which must match with the titles.

Step 7. Now, Save the widget and finally you're done!

Make sure you have placed the featured post widget on the top of the "Blog Posts" as shown below:


I hope the customization is not so hard. If there is any confusing then you are free to ask question via Comment. Also, you can share you opinion and suggestion.

UPDATE: Try using this hack so the widget will appear only on homepage and it won't overlap the posts: Hiding Featured Post Widget in Post Pages in Blogger

Do you like this featured post widget? Let us see your work!

View This Article / Download>>

Friday, 10 September 2010

Recent Post Widget for Blogger Using Google API

Earlier, I posted about how to add Recent Post Widget for Blogger using Feedburner. FeedBurner widget load quite faster than other, even I am using that Feedburner Recent Post widget for my blog.

Recent Post widget for blogger Using Google API

Now again, we'll learn to add the Recent Post Widget for Blogger by using Google API. This widget is much smarter than before's. I guess you'll surely love it after viewing the demo (See below).

Loading...


Thats the Recent Post Widget what you seen above. It is just like the featured content and have a stylish looks.

Lets see what have been added to this new recent post widget:

Features

- Google API code used
- Layout of featured content
- Automatic sliding and a short summary on the top
- Professional Looks
- Hover effects

In fact, this is a new Recent Post widget which is based on Google API codes.

Implementation on your Blog

To add this widget on your blog, simply follow the following steps:

Log on to your Blogger account and go to Design > Page Element > Add a Gadget > HTML/JavaScript.

Add the following code:


    Loading...


Get this Widget

Replace YOUR BLOG TITLE with your blog name and http://yourblog.com/ with your blog URL. No need to give a title to your widget because there is already a title named "Popular Post" in default.

Save the widget and view your blog how it looks like.

This widget loading power is slow as comparison to Feedburner recent post widget. However while loading this widget, it display the small text "Loading...". It enhance the widget visibility.

Have you added this widget on your blog? Let us view it!

View This Article / Download>>

Thursday, 9 September 2010

Fast Loading Recent Posts Widget for Blogger

Almost all of the recent posts widget is based on the JavaScript codes. It may effects on the loading time of the blog. But now, you don't have to worry about that! I'll show you how to add fast loading recent post widget on your blog.


You may have the recent post widget provided by blogger that you can add it using your feed URL. But, that was pretty slow. In fact, FeedBurner recent post widget is 100% working. You can see the done on this blog as well (On the right sidebar).

Actually, this widget is derived from FeedBurner which is very systematical and easy to install. Lets do that! Just follow the following steps to add feedburner recent post widget on your blog:


Adding Feedburner Recent Post Widget

1. Log on to your Feedburner account (Sign up here it you don't have already).

2. Click on the Publicize button on the top navigation bar,


3. On the left sidebar, click on the BuzzBoost.


4. Now, scroll down until you see the options to customize.


Check the options as your need. You can leave the options unchecked to make it looks perfect! But, you have to choose Number of links to display on the widget. Here I have choose 10 post to display.

5. Now click Save button (Below the options).

6. You can preview the widget as show below. And copy the code they provided.


7. Log on to your Blogger account. Go to Design > Page Element > Add a Gadget > HTML/JavaScript. And paste the code that you have copied on step 5.

Click to Enlarge


8. Save the widget and you're done!

I hope you like this widget. Now, you don't have to use other JavaScript codes or Feed URL to add recent post widget. Also, you can customize this widget as you have done in step 4. After customizing, you don't need to worry about the code that you have added on your blog (FeedBurner automatically arrange it).

Share your opinion how do you like this widget?

View This Article / Download>>