Pages - Menu

Showing posts with label Tips n Tricks. Show all posts

Thursday, 14 July 2011

Sign In With Multiple Emails In Google Plus

You might have already joined Google Plus, if not you can get one invitation from us. Google Plus is up with great features which makes the users to use it frequently. As we know Google already announced that we can Sign in to Google accounts with multiple emails. So, we can also use multiple emails to sign in to Google Plus.

Lets see how we can do it.

Step 1


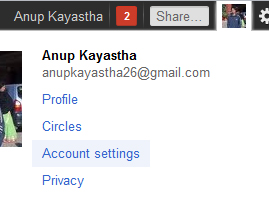
Log in to Google Plus and click your name containing at the top right side of the page. Click Account settings option.

Step 2


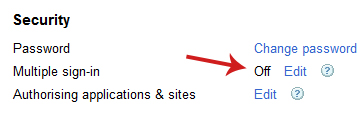
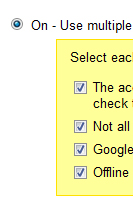
In the Security, you'll see Multiple sign-in. Click 'Edit' link just next to it. In the next screen choose 'On' option and check all the required that will make you sure how to use multiple sign in feature (see below).


Click save button.

Step 3


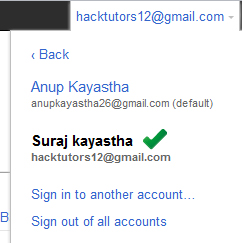
Now again, at the top right side of the page. Click your name and click Switch account > Sign in to another account...

No finally you can enter you username and password of your existing Gmail email. After all, you can switch to multiple accounts. See below.


Finally you are done and enjoy using Google Plus. If you know more tricks about Google plus then kindly share it via comment below.

View This Article / Download>>

Tuesday, 30 November 2010

7 most important things HTML beginners must consider

When you start learning coding and web designing in HTML, you basically begin with normal HTML markup. Laying out a page, adding colors, buttons, images etc are just the basic part you never skip to design your page.

But being a beginner you must know that no matter how basic your code is it can still have some uninvited errors. There are certain important things that you must consider to make your coding valid and capable to view in any browser window.

Let’s discuss what those 7 things are.

Make your code human readable
Because you are a HTML beginner, you are never going to use any HTML editing software like Dreamweaver, FrontPage, etc. are you? You literally start with a NOTEPAD or similar text editor and start coding but have you ever thought that you need revise your HTML markup sometime?

In the image below can you easily find the parent tag or its order?


The answer to the question is probably no if you are a beginner. Because such type of coding is just easily readable by the browser not the user. You must make it clearly readable by yourself so that you can easily find the section you are looking for in future modification.

Though the HTML tags are enclosed in “<” and “>” our brain cannot easily distinguish it from other character easily in such a huge crowd. Instead you can use CAPITAL LETTERS to rectify the HTML tag out of the web contents.


Look how the tags are distinguishable from the text contents.

Other thing you can do is make a tree order so that you can easily find the parent or child of the tag easily. This can be done by leaving some space from the right. See the example image below for more clarification.


This trick will make you easy to edit and look for the exact tag when necessary.

Using of HTML comments wisely
It is not much necessary to use HTML comments because, HTML comments are for users and browser doesn’t render it in its window. The necessity of HTML comments rises when your HTML markup goes more complex and complex. In such case using of HTML comments is necessary. As we’ve already discussed about human readability of the code in first step.


The HTML comments start with “” everything between the start and end code is not rendered in browser screen but you can easily find the it in it’s source.


Always close the tag
I understand you know this fact, but when the codes get complicated with larger contents and lots of inner divisions and blocks you’ll get confused in the middle of the path. Basically, when you view the HTML page that have unknown incomplete tags, the contents will be visible with no errors. But incase if you have added some CSS styling and tables to your web design layout you’ll probably have lots of error and fault in proper rendering in such unknown incomplete tags. Therefore ending a tag is most important thing.

Even though you are aware about it you miss to close the tag because we cannot always remember which tag was opened first and which was at last. But there is a trick (or say tips) that you can apply to have your HTML tags complete one.

Whenever you begin for a new HTML tag, close it immediately after the opening of tag.

For example, look at the sample coding below. The tag is closed instantly after it’s opening.


Then you can start filling the contents and other sub tags inside it.


Always provide alternate text for the image
This trick though won’t affect your coding, user readability or browser render-ability, it is recommended that you use alternate tags.


The above tag renders a image file named image.jpg from the specified source. But incase if you don’t have the image in specified location or mistakenly deleted the image file it will render nothing (in some browser it will show image icon or red cross icon).


Remember how important the image can be to the web page visitor. To understand your contents, S/he must know what the image was about. You must use alternet text what will  show up when browser is unable to locate your image file. This will at least give the imaginative picture of the unknown image.

”Image


Proper sequence of Headers
H1 is the first and largest header of your HTML document. If you use header (H1, H2, H3) tags you must use it in sequence. For example,

must be preceeded by

or

or

but they must not be parented under smaller header see the image below.


But this one is not right because, lower header must not parent larger header. Though this won’t show any error it is not considered as good method.

Moreover parenting headers is not recommended even it is acceptable and can be rendered properly.

Use of block and inline HTML elements
You must understand the meaning of block and inline HTML elements. Usually a HTML element can be a block or inline element. The block element is like a box that can contain other contents inside it. The inline elements doesn’t have box wrapped around it and only occupies the space that its contents have. While block element occupies as much space as it is capable of until the size or width is specified.

is literally a block element while , , , , etc are inline elements.
inside is not recommended but you can use as many as you can inside
.


Seventh? What can be the seventh one? Comment here.

View This Article / Download>>

Tuesday, 24 August 2010

Message Notification Widget for Blogger

You must want to go ahead by organizing friendly relation with your blog readers. You may have been using the different methods like organizing blog Contest and commenting on others blog. Don’t you think if there is any new method?


Recently, I post about how to remove widget automatically after someone visited the link. That’s quite unique. As I promised, I came back with another new trick about how to use that in your Blogger blog. Just before this post, I haven’t specified how to use this in your blog.

So, let’s get started.

Apply to Your Blog

First of all let’s erase your curiosity by viewing the DEMO on this post. You have to create the new Page for your blog. Go to Blogger.com > Posting > Edit Pages > Create new page. Now write the formal message in that page to your reader. See the example here.

Now, Add the new gadget on your blog. Design > Page Element > Add new Gadget > HTML / JavaScript. Paste the following code:


http://www.hacktutors.info/p/new-message-from-admin.html">Unread Message

Don't forget to replace red color URL with your Page URL that we have done in first step.

Again, follow the steps below:

1. Log on to Blogger.com

2. Head out Design > Edit HTML. (No need to check Expand widget Template box)

3. Now, Search for the widget ID that you want to make changes. For example, I’ placed the widget named “New Message” on my sidebar. So, I’ve to search for something like this:


Now, the widget ID is HTML7. Remember we only need widget id.

Copy the widget ID on something else (Notepad).

4. Now, Search for ]]> tag on your template. Just above this tag, create the new CSS pattern just like this:

#HTML7 ul {
list-style:none;
margin: 0;
padding: 0;

}

#HTML7 a:visited {
display:none;
}

Don’t forget to replace HTML7 with your widget id that we've done in step 3.

Now view your blog once again. It may work now :)

Hope it helps you a lot. This is the very good way to notify your reader with the new message. After your reader view the message it will not appears on the second time. That means it is just like the E mail Message! It will automatically disappears if your individual reader already viewed the message.

Share your opinion do you like this new trick for blogger?

View This Article / Download>>

Automatically Remove Widget after Visited using CSS

Today I'll teach you, how to show widget only once after viewing it. Your widget will automatically remove after your visitor click the link or image containing in the widget. Your visitor can't see the widget on the second time if they already viewed it. This process can be applied to your each visitors using some HTML and CSS tricks.


First you have to see the DEMO to get clear information about this. You can see the image of New Message on the top of the post in this blog. Note: If you already clicked that image then, it may not visible. To make it visible, clear the cookie of your browser or open your alternative browser.


So, you found it cool? You can apply this unique HTML / CSS tricks to your website or blog. Follow the following steps:

1. In you HTML file, find the DIV code of the widget which you want to use this trick.

2. Copy the ID of the DIV widget. It may be something like this,
yourid">

3. Now, in your Style section, use the following CSS code:

#yourid a:visited {
display:none;
}

Replace yourid with your DIV id. Now, view your blog or website!

Example

Let me show you an example of this work. Suppose I have the following DIV code:

image">


In the above example, I have the image with link between the image DIV code. Now, I apply the following CSS code in my CSS section:

#image a:visited {
display:none;
}

Now, the result may looks like this,

Unread Message


Click the image above and refresh this page, you may not see the image in second time. Finally you're done.

How it Worked?

The CSS tag a:visited can be recognized as the visited link, image or anything that consists on specific widget. With the help of a:visited and display:none; tag, the hole widget removed after any person view or click the link containing on the widget.

display:none; tag hides the contents of the widget. If there is no a:visited tag, your widget will not visible in the first time even someone haven't visited already.

So, this was the unique trick to hide the widget after the first click or view of each individual visitor of your blog / website. This may be helpful if you are regular web designer or blogger. You can think yourself how you can use this trick in your work.

I'll be coming soon with the post How to use this trick on blogspot blogger blogs. Till then, Don't forget to show me your work here :)

Do you have a HTML / CSS trick like this? Share with us!

View This Article / Download>>

Wednesday, 4 August 2010

How to Increase your Affiliate Earnings

Most of the internet marketer are earning from the affiliate program. Lately I posted about the recommended marketing site that you can make money from it. Affiliate program is great way to earn by promoting the affiliate links. Also this is a way to maximize your online earning.

You’ll get paid if anybody signed up or made any purchase through your affiliate link. But, most of the people are unable to promote their affiliate link and have no idea to earn through affiliate. Considering this, I’ve some effective tips that you can earn frequently via affiliate program:


Promotion via Forum

Forum plays the important to promote your affiliate link. You just have to be active in niche forum and place the link to affiliate as signature. Post your offer to different popular forum so that everyone can see your link from different places.

Recommended Forums: Digital Point, Warrior Forum, Site Ground.

Use your blog

If you are good bloggers, you must have experience in blogging. Try to promote your affiliate link as how you promote your blog. Affiliate Company provides different attractive animated banners. Use the affiliate banners in the best viewable place of your blog where your visitor can easily view the affiliate banner. Post about affiliate program with your link. Your Feedburner reader can view about your offer through their email inbox!

Socialize the link

The popular social bookmarking website like Facebook, Twitter, LinkedIn can promote your business. Even your friend may searing for the different services like web hosting, web template and design which is related to your affiliate program.

You just have to focus on your words what you say like:

Hey friend, Check out this cheapest web hosting service ever I seen!


Read: 10 Tips for using Twitter to Promote your site
          10 Best Social Network Sites for Business Professionals

Partnership and Reward

Everyone may not have enough money to buy the service with heavy price. So, you have to make offer for some impression. Try to catch some people who are searching for the service related to your affiliate. Tell them to reserve or buy the service through your affiliate link. If they completed give them some rewards for their work.
They’ll also share about your reward program to many people and you’ll receive lots of affiliate sign up(s).

Read: Keep In Touch Blogger, We want to Know You!

Article Marketing

Guest posting can increase your blog personality. Most of the blog author doesn’t allow inserting affiliate links on the guest posts. So, you have to use the article directory site to post your article and place your affiliate link to author section. But you must post content related to your affiliate. For example, if your affiliate is related to web hosting then you must post about web hosting.

Read: 50 Articles directories to promote your blog

These are the effective way by which you can promote you affiliate link and earn money from it. Once you get success on affiliate marketing, you’ll earn enough money to make good sale and promote your affiliate link once again.

Share your opinion, what propose do you use to promote your affiliate link?

View This Article / Download>>

Friday, 7 May 2010

10 Essential iCal Tips & Tricks You Should Know

iCal, the popular Apple calendar has a lot of power that can be used to get your life organized. While some disagree, most Apple users believe that iCal is an invaluable resource for keeping their lives organized and running on schedule. Here are 10 essential iCal tips and tricks that you should know.

  1. Change the default event duration - By default every event in iCal is created as lasting one hour. You can change this so you don’t have to manually change every entry you make. Just a simple command typed into terminal can do the trick.

  2. Resolve issues with stuck iCal updates - Uncheck and then recheck the calendar display option box and you can relieve yourself of those painful 1000% resource utilizations when the updates don’t work.

  3. Integrate iCal with Kinkless GTD - Organize tasks by metagroups, and more using serious getting things done principles.

  4. Open files on schedule - iCal can be used to open a file at a scheduled date and time. Have you thought about writing an Applescript and letting iCal open it? Use this to play music, load web pages, or run complex batch routines.

  5. Use the keyboard shortcut Command+E to go straight to an editable window - You can also edit an event without the popup. All you have to do is select the event, press Enter and start typing. You can even change your titles to three lines of text by pressing Option +Enter. Another tip is to realize that event popup windows are movable. This is especially important when the window blocks important information on your screen. Just click the popup and drag it out of the way.

  6. Set multiple alarms for a single event - This is handy when you have something important to do and you want to make sure you don’t miss it. In the event’s Info panel, click “Alarm” and you will see a menu for adding alarms. You can even set alarms to go off after the event. This can be used to remind you to clean up following an event or a variety of other situations.

  7. Explore Easter eggs -Easter eggs are cool hidden features within a program that can include commands, a credits list, and animations.

  8. Print to do lists directly from iCal - Click on File and then Print (or press Command + P). To print a list, change the View field to List from Month and uncheck all the options except for To Dos.

  9. Migrate from Outlook to iCal - If you’ve wanted to switch over to iCal but didn’t want to re-key your data, there’s a way to do it. Using Palm Desktop as an intermediary, the process that once seemed impossible becomes quite easy.

  10. Customize the alarm message - In just a few steps you can customize the alarm message in iCal. The process involves creating a .mov and replacing a file in your iCal installation.


Go ahead and give these tips a try. You will be surprised at how much you will learn just by checking out the links, exploring iCal, and doing things just a little bit differently to squeeze even more out of iCal. Caution: once you begin tweaking iCal it’s hard to stop. iCal quickly becomes addictive.
The guest author, James Adams, is a writer and designer working for Cartridge Save where he reviews products such as the HP 21 ink cartridge.

View This Article / Download>>

Thursday, 22 April 2010

10 Smart Ways To Protect Your Blog From Hackers

It's an unfortunate reality of the Internet today that there are people out there who would like to hack your WordPress blog. It's possible that you may have made an enemy who would like to get back at you by hacking your site, but more frequently hackers are simply looking for an easy target. Here are 10 ways to ensure that you aren't that easy target.


  • Upgrade WordPress: Perhaps you have wondered why WordPress releases a new version of its software every few weeks. Thousands of people go over the Wordpres code every day in an effort to improve it. A lot of the time, they are trying to plug up security vulnerabilities which hackers have figured out how to exploit. By upgrading regularly, you can be sure that you have all the latest security fixes.


  • Update Plugins: Many times, hackers will figure out how to gain access to your blog through a vulnerability in one of your plugins. The creators of these plugins often release updates that are more secure, which is something you should take advantage of by updating them regularly.


  • Hide Your Plugins: If the hackers don't know which plugins you have, then they won't know where to begin trying to hack your site. The way they find out which plugins you have is by looking in your  /wp-content/plugins directory. If you create a blank document, save it as index.html, and upload it to this directory, you can prevent anyone from accessing this information. Alternatively you can block the standard file list from showing with .htaccess.


  • Get Rid of "Admin": Do you still use "admin" as your username to log into your account?
    If so, you are making things much easier for hackers. If they know the username of your administer's account, then hackers already have half of the information they need to break into your account.


  • Stronger Password: If your password is something like "wood floor", then it can be extremely easy for hackers to guess. They can often simply use a program which guesses your password based on dictionary entries. Create a lengthy password made up of upper and lower case letters, numbers and characters in no particular order and avoiding dictionary words.


  • Login Securely: One way that hackers will steal your password is by intercepting it through the network while it is on its way to WordPress. You can solve this problem by installing the Chap Secure Login plugin. This plugin will automatically encrypt your password when you login, so the hackers will only be able to see your username.


  • Remove Your Version Information: Often, hackers will attack your site based on the version of WordPress you are running. If they don't know which version you are running, they won't know how to attack your site. Install WP Security Scan to remove the identifying code from the header and feeds.


  • Prevent Brute Force Attacks: One of the simplest ways for hackers to break into your account is to try different passwords over and over until they find one that works. The easiest way to prevent this is to use the Login LockDown plugin. If someone fails to guess the correct password 3 times within a 5 minute period, this plugin will prevent them from even trying again for the next hour.


  • Scan for Security Holes: The WP Security Scan plugin will automatically scan your blog and let you know if there are any problems with it that you should consider fixing. It lets you quickly change your files permissions, verify your htaccess file, and detect break-in attempts.


  • Get Maximum Security: Currently in beta, Maximum Security is a full featured security platform for WordPress blogs. This plugin will allow you to prevent hackers from browsing all your site's files and adjust your firewall settings. It can be a full time job keeping your site secure and free from hackers. If you implement some of these tips, much of the work can be done for you automatically.


  • As a full time blogger, Tom Walker works for an online supplier of ink cartridges where he is the lead editor at the CreativeCloud. He covers topics as varies as vintage advertising to packaging design.

    View This Article / Download>>

    Saturday, 17 April 2010

    12+ tips to show your inner or older blog post to your reader

    Do you ever think, Why your old blog entries and your older article, post is most non viewed elements? Many of you start blogging with annoy identification. It doesn't matter but, this may hurt you after you have large number of blog post. So, you understand? You have to start blogging with entire known identification. Then you and your blog must be popular. This is the solution for the beginners. But, people who already done their work to their blog, What should they do?

    You have a good content in your blog. And that content are not able to show to your reader, because that is inside and inside in your blog. So, here is some tips to show your good quality article inside your blog.


    Placement of navigation bar on top:  You should place some navigation menu bar to the top of your blog header with some link. Just don't forget not only link, it should be attractive to impress you loyal reader. And navigate to your blog post or different labels.

    Random posts: Try to put a random post widget to your blog. This helps to your reader to see the random post whether, they are older or newer.

    Removal of useless widget:  If you have some useless widget to your blog, then try to remove it. Because your blog will be heavy and your loyal reader can't access your blog perfectly. If your reader click any other internal link of your blog post, then most of the visitor doesn't patience and get out from your blog or directly close your blog window.

    Page navigation: You show place page number navigation widget to show exact number of  your blog pages. Either, they can directly jump to your farthest blog post. And your older blog post will be reviewed. But, you have to ensure that  your widget must be well designed and impressive.

    Link to your older post: Time-to-time, you should link to your older blog post by the topic of current features. If you get some topic and you remember your older posts, the of course you can link to it to your post in your new article.

    Search bar: Search form is equal important. Your reader can search whatever they want from your blog. They can found their topic and you also happy they also happy :)

    Related post: You have to place related post widget to each blog post. And your older blog post can be viewed by your loyal reader. Try to place link not picture with thumbnail.

    Contest management: It is very awesome way to redefine your old and new articles. For example, I just launched Top Commentator Contest and also I announced winner. See these links to see the contest result. You can get comment and get views of your older post. Reader try to comment more. In the path of commenting lots of visitors go to comment in your inner post.

    Resolve the temporary issues: If your have commented in your inner post of your blog requesting to solve the problem of your blog or their issue then, don't be lazy. Immediately try to place your work in rest position and let's hear your reader's voice.

    Commenting to others blog: If you find related article in others blog, the you can link to your blog with encouraging words like, We have same article!

    Add rest of the widget: You can put rest of the linked widget to your blog like populat post, recent comments, most discussed, etc.

    Keyword popularity: In the search engines, all the website article are searched in the basis of quality keyword. Any one can reach to your any post from the search engines. So, it is important to have quality keyword.


    The above are my guess. You can added your own think and voice in this post. Just share your mind via comment. Feel free to take some action about this topic.

    View This Article / Download>>

    Sunday, 14 February 2010

    Meta Tag hack to automatic increase your page views in blogger

    HTML is more important to take some awesome action. I have found a code which can increase your blogs page views automatically. It helps you to increase global ranking and more...but, it is not recommended and it's illegal, that's why it is called hack! Do it at your own risk.

    If you really want to apply this hack on your blog, Go to Blogger.com>>Layout>>Edit Html


    Then, search for the following code:
    And add the following code just below
      
     The number 5 is in second. You can change as your like. You can also force your visitor to go to another page and refresh/reload. Apply the following instead of above code:


    youraddress.html">


    Replace the red colored text with your post or blog URL. You can remove it after work is compleated!


    Refreshing site with the help of another site automatically                

    Of course you can also use the special sites to reload page automatically. Visit the site Pagereboot.com 

     Insert your URL, place time to reload the page and click Start. And it will begins to refreshing automatically.

    Note: This post is not for disclaimer. Do it at your own risk. If you have Google Adsense in your blog,  then it is strongly prohibited.

    View This Article / Download>>

    Friday, 1 January 2010

    Placement of Ads or Widgets below the post title in Blogger

    This post is specially for one of my reader. I have just received a comment from Sarvesh. He was asking about how to put the Google ads below the post title. This will give better ad revenue and this is one of the good placement of ads.

    Admin
    it will great if you show how to add ads in the post like you have in blogger i want to know it plz will u write a post abt it or tell me plz :)
    I am glad to answer this question. Now have a look how to do this.


    First log in to Blogger.com -> Layout-> Edit Html tab and Check Expand Widget Template.
    Search for the following line of code:
    If you haven't found above code, search for the following:
     
    Got it? ok. Now you can add the widget (ads) code just below the above code. See the below example:


    You ads Code Goes Here....
                             OR

    You ads Code Goes Here....
    Replace the red colored text with your ad or widget code. If you get some problem like the ads or widget are show in home page also, you have to put some line of the code to show the widget in only one post page ( inside the page).

    Replace the code which you have found above with:


    You ads Code Goes Here....(first ad)

                                 OR


    You ads Code Goes Here....(first ad)

     
     Now, you will see your ads or widget are only inside the page. But don't forget to replace red text with your code.
    Placement for second ad

    The above one is first ad (left in position) . Now you can put second ad (Right in position). See the following example for details:


    You ads Code Goes Here....(second ad)

                            Or


    You ads Code Goes Here....(second ad)

    Updated

    It may not work if you copy the ad code directly form adsense. You have to encode that html ads code. Do the following:
    Copy & paste your ad code to following form and click Convert. Then copy the code after converting it & replace red text with the code which you have converted.


    And that's it. Hope it was clear. If you get some problem, you can frequently ask me :)

    View This Article / Download>>

    Thursday, 31 December 2009

    Add Advanced Three Wrapper Widget in blogger

    You have seen the three wrapper widget in many modified templates. It is very useful in blogging platform. You can add html and javascript gadgets like recent posts, recent articles, popular posts or whatever you like. It is better to add gadgets in sidebar. But it's more better to keep widget in bottom of the page.

    As it is bottom of the page, readers can read your full article first and widget in last. Where widgets are not much important your post. See the following example:


    You can add this widget by following the steps.

    First Log in to Blogger.com

    Go to Layout -> Edit Html Tabs.

    Now search for these code:


       Paste your code here. And paste the below code as show above:


    If you get some problems, you have to add the CSS code.

    Now, find ]]>

    Paste the following code before ]]>


    #lower {
           margin:auto;
           padding: 0px 0px 20px 0px;
           width: 100%;
           background:#F6F6F6;
          
         
    } 
    #lower-wrapper {
           margin:auto;
           padding: 30px 0px 20px 0px;
           width: 960px;

    }

    #lowerbar-wrapper {
           border:1px solid #DEDEDE;
           background:#FFFFFF;
           float: left;
           margin: 0px 5px auto;
           padding-bottom: 20px;
           width: 32%;
           text-align: justify;
           font-size:100%;
           line-height: 1.6em;
           word-wrap: break-word; /* fix for long text breaking sidebar float in IE */
           overflow: hidden; /* fix for long non-text content breaking IE sidebar float */
    }


           .lowerbar {margin: 0; padding: 0;}
           .lowerbar .widget {margin: 0; padding: 10px 20px 0px 20px;}


    .lowerbar h2 {
           margin: 0px 0px 10px 0px;
           padding: 6px 0px 10px 6px;
           background: #7AA1C3;
           text-align: left;
           color:#FFF;
           font-weight: normal;
           font-size:16px;
    }

    .lowerbar ul {
          margin: 0px 0px 0px 0px;
          padding: 0px 0px 0px 0px;
          list-style-type: none;
    }

    .lowerbar li {
          margin: 0px 0px 2px 0px;
          padding: 0px 0px 1px 0px;
          border-bottom: 1px solid #ccc;
    }

    .lowerbar a {color:  #698CAB; text-decoration: none;}
    .lowerbar a:hover {text-decoration: underline; color: #B5BFC9;}
    .lowerbar a:visited {text-decoration: none; color: #B5BFC9;}

    You can customize the CSS code as your like and Save The Template. And you're Done!


    See in the layout section. You can find three new advanced 'Ad a Gadget'. Now add whatever you like!

    View This Article / Download>>

    Saturday, 5 December 2009

    Arrange your Comments Avatar with CSS in blogger

    Showing the profile image in blogger comments is being popular now a day. But, it comes to have many problems based on CSS code. Many of them are searching for good CSS based codes. As I have got some problem like there is no extra place for profile image avatars. Look at the below screenshot.


     Playing with CSS and having some fun I have a trick for that. Now, look at this solved problem.

    Isn't it cool? Of course it is:)

    Now how to do it.
    First of all Go to Blogger > Settings > Comments and enable “Show profile images on comment” as before.

    In your blogger's Edit Html section search for the following code in CSS area.

        #comments-block
        width: 580px;
        float: left;
        padding: 0;
        margin: 0;
    Search only #comments-block for easy (Press Ctrl+F). Now you have to customize that CSS. Change the width 580px to 545px (The width must have different according to your template) and float: left; to float: right; or you can change it's width according to your template.

    Now go to Blogger Layout >Edit HTML and backup your template. Don't forget to check "Expand widget templates". And find the following code:


    Or if you haven't find the above code, try to find this:


     And finally you found it? Ok then replace it with this.


    Now again find this line in code: ( You can find this code easily press Ctrl+F)


    And replace it with below codes.


    Now Just Go to blogger edit/Html and find for ]]> tag and place the below css codes before it.
    /* Avatar */
    .avatar-image-container img {
    background:url(http://www.gravatar.com/avatar/ad516503a11cd5ca435acc9bb6523536?s=35);
    width:35px;
    height:35px;
    }
    Of course you can just edit the image link, height and width in above css codes as you like.

    And save the template, you are Done! :) Look at my comments how it looks as better than before.
    I hope your problem is solved like mine. If you have still some problem leave your comment I will try to solve it. Feel free to ask questions.

    View This Article / Download>>

    Friday, 20 November 2009

    Cool CSS Hacks For Blogger/Blogspot

    I have posted Making more professional blogger blogs before this. I suggest you to play with CSS because it is one of the cool stuff to make blog professional and well manage. And today I am sharing you some cool & good looking CSS hacks for your blog. It helps you to have more professional:) So, let's try it.

    Create a stunning 3D push button

    Nowadays, we can see 3d push buttons nearly everywhere. Most of them are achieved via JavaScript. The main problem of using these scripts is that there are greater chances that they might get blocked by the browser. And with the advent of many ad blockers it has become a serious drawback. In this situation, the CSS comes to rescue. Thought we can’t create 3d push buttons as professional as created by using JavaScript, we can create a basic 3d push button with the help of CSS.


    The main CSS commands you’ll need are:
        a.pushbut {

        color:#26a;
        display:block;
        border:1px solid;
        border-color:#aaa #000 #000 #aaa;
        text-decoration:none;
        width:8em; text-align:center;
        height:2em; line-height:2em;
        background:#fc0; font-weight:bold
        }
        a.pushbut:hover
        {
        color:#26a;
        background:#ffd633;
        position:relative;
        top:1px;
        left:1px;
        border-color:#000 #aaa #aaa #000
        }
    These must be within