Pages - Menu

Saturday, 11 September 2010

Free 1 Year Domain Registration and Monthly Hosting $10 Off

If you are planning to start a new blog with reliable web hosting, then this is the great offer for you. I've created the new promo code with Dream Host. Dream Host provides you really reliable web hosting service with lots of advanced features. I'm sure you 'll found a great difference than other web hosting services.

Free Domain Registration and Save $45 Using Promo codes on Dream Host

Read: 8 Recommended Affiliate Programs to Make Money Online

Start a new plan on Dream Host and get a heavy discounts. If you have already planned to start a new blog with Dream Host then you are ready to get discounts.

What you can get?

1 Year Free Domain Registration cost of $15 (Any domain name)
$10 off in Monthly Hosting Plan
$20 off in Yearly Hosting Plan
$30 off in 2 Years Hosting Plan

It means you can save $45 if you have planned your blog for 2 years hosting with any new domain name!

How to get Discounts

You have to Sign up for Dream Host. Note: Don't choose the web hosting plan for more than 2 Years. Other wise you'll not get discounts.

Watch out, when you see this screen,

Click to Enlarge
Insert the promo code as NEWHACKTUTORS on "Promotional code or email address that referred you" form (See the above image).

Make sure that you have written right information which is important in future. You'll redirected another page and you'll see this form.

Click to Enlarge
Also make sure that you have got the Free additional Domain registration and Promo code Credit (See the above image). Insert your credit card information and click Continue Button.

Finally you've got $10 monthly $20 Yearly and $30 for 2 Years web hosting and 1 Years free Domain registration! And you saved $45 for 2 years hosting with free domain name.

Once again, the Coupon code is NEWHACKTUTORS

Enjoy the free domain registration and web hosting. Let me know if you have registered with this process on Dream Host.

View This Article / Download>>

Stylish JQuery Featured Post Widget for Blogger

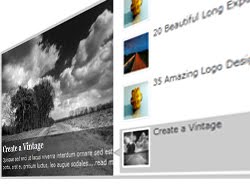
Featured Post widget is important to add the most interesting content of your blog. By adding featured post widget, you can emphasize the most popular content and show it to your readers. You may have seen these kinds of widget in similar WordPress blogs.


Today, we'll learn how to add it into Blogpsot Blogs. Earlier, I created Platinum Blogger Template. From the most of the template users, I received the comments that Featured Post widget is not present there. So considering this, I am writing the separate tutorial which we will start now!

First of all view the Demo here.

Note: Platinum Blogger Template users don't have to follow the Step1, Step2, Step3, Step4 and Step5. So you can directly jump to Step 6.

Updated: All code has been updated. Please re follow the instructions those who have installed this widget.

Step 1. As general, Log on to your Blogger account and go to Design > Edit HTML.

Step 2. Find the following code in your Template:

]]>
Step 3. Just above  ]]> tag, add the following CSS codes:

#featured{
width:336px;
padding-right:250px;
position:relative;
height:250px;
background:#fff;
border:5px solid #ccc;
}
#featured ul.ui-tabs-nav{
    position:absolute;
    top:0; left:336px;
    list-style:none;
    padding:0; margin:0;
    width:250px;
}
#featured ul.ui-tabs-nav li{
    padding:1px 0; padding-left:13px;
    font-size:12px;
    color:#666;
}
#featured ul.ui-tabs-nav li span{
    font-size:11px; font-family:Verdana;
    line-height:18px;
}

#featured .ui-tabs-panel{
    width:336px; height:250px;
    background:#999; position:relative;
        overflow:hidden;
}
#featured .ui-tabs-hide{
    display:none;
}

#featured li.ui-tabs-nav-item a{/*On Hover Style*/
    display:block;
    height:60px;
    color:#333;  background:#fff;
    line-height:20px;
    outline:none;
}
#featured li.ui-tabs-nav-item a:hover{
    background:#f2f2f2;
}
#featured li.ui-tabs-selected{ /*Selected tab style*/
    background:url('https://blogger.googleusercontent.com/img/b/R29vZ2xl/AVvXsEjwZL6E0NLXMhPfYkwKXHuU7A2hVAKg-hZdlwq1ZAoNLJ2jkkCmj_2RvBxLhf35aUvL8Y_Xi_iXJX8ZPDB9xgNhKjLiQ75WV5_59Btyv1WhDeAB7S00f0BXD0JL9-90DHGJx5NVpJNunlE/s1600/selected-item.gif') top left no-repeat;
}
#featured ul.ui-tabs-nav li.ui-tabs-selected a{
    background:#ccc;
}

#featured ul.ui-tabs-nav li img{
    float:left; margin:2px 5px;
    background:#fff;
    padding:2px;
    border:1px solid #eee;
}
#featured .ui-tabs-panel .info{
    position:absolute;
    top:180px; left:0;
    height:70px; width: 400px;
    background: url('https://blogger.googleusercontent.com/img/b/R29vZ2xl/AVvXsEhYGPtXxqF6XCWdx3J75Rh92tIGYqXGTFyxA4knBy-P9f6JeulzCN6nao8c3-x5DgYflkMS2GcI1YJDC1FEvySvh5wtbPwrN5VioSrzZiTdGUeJNj8ZSNnqfhv-RZVGjeJE6T-iqMS0P7s/s1600/transparent-bg.png');
}
#featured .info h2{
    font-size:18px; font-family:Georgia, serif;
    color:#fff; padding:5px; margin:0;
    overflow:hidden;
}
#featured .info p{
    margin:0 5px;
    font-family:Verdana; font-size:11px;
    line-height:15px; color:#f0f0f0;
}
#featured .info a{
    text-decoration:none;
    color:#fff;
}
#featured .info a:hover{
    text-decoration:underline;
}

.ui-tabs-nav-item img {
width:45px;
height:45px;
}

Step 4. Now, add the following JavaScript code above the tag:


Step 5. Save the Template.

Step 6. Again, Head out to Design > Page Element > Add a Gadget > HTML JavaScript. Add the following code into the box:


These codes are little bit confusing. So, you have to edit these codes carefully. Here is the customizations:

Replace fragment-1, fragment-2, fragment-3 and fragment-4 with your post URL. There is two link in the code but you have to place same URL. For example: There is two fragment-1. So, replace these two fragment-1 with same post URL.

Red color code is for image URL. Do same as you have done for the Links above. There is two image URL. So replace Image URL with your own. For example, replace both Image URL of Link-1 with your own. Note: the both Image URL must be same.

The text with Pink color is the title of each post. So, replace all of the Pink color text with the title of your post.

The text with Green color is the summary of the post. Replace these text with short summary which must match with the titles.

Step 7. Now, Save the widget and finally you're done!

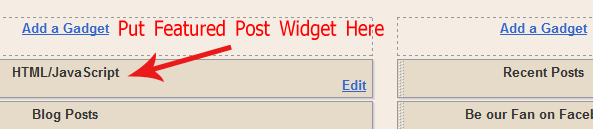
Make sure you have placed the featured post widget on the top of the "Blog Posts" as shown below:


I hope the customization is not so hard. If there is any confusing then you are free to ask question via Comment. Also, you can share you opinion and suggestion.

UPDATE: Try using this hack so the widget will appear only on homepage and it won't overlap the posts: Hiding Featured Post Widget in Post Pages in Blogger

Do you like this featured post widget? Let us see your work!

View This Article / Download>>

Friday, 10 September 2010

Recent Post Widget for Blogger Using Google API

Earlier, I posted about how to add Recent Post Widget for Blogger using Feedburner. FeedBurner widget load quite faster than other, even I am using that Feedburner Recent Post widget for my blog.

Recent Post widget for blogger Using Google API

Now again, we'll learn to add the Recent Post Widget for Blogger by using Google API. This widget is much smarter than before's. I guess you'll surely love it after viewing the demo (See below).

Loading...


Thats the Recent Post Widget what you seen above. It is just like the featured content and have a stylish looks.

Lets see what have been added to this new recent post widget:

Features

- Google API code used
- Layout of featured content
- Automatic sliding and a short summary on the top
- Professional Looks
- Hover effects

In fact, this is a new Recent Post widget which is based on Google API codes.

Implementation on your Blog

To add this widget on your blog, simply follow the following steps:

Log on to your Blogger account and go to Design > Page Element > Add a Gadget > HTML/JavaScript.

Add the following code:


    Loading...


Get this Widget

Replace YOUR BLOG TITLE with your blog name and http://yourblog.com/ with your blog URL. No need to give a title to your widget because there is already a title named "Popular Post" in default.

Save the widget and view your blog how it looks like.

This widget loading power is slow as comparison to Feedburner recent post widget. However while loading this widget, it display the small text "Loading...". It enhance the widget visibility.

Have you added this widget on your blog? Let us view it!

View This Article / Download>>

Thursday, 9 September 2010

Fast Loading Recent Posts Widget for Blogger

Almost all of the recent posts widget is based on the JavaScript codes. It may effects on the loading time of the blog. But now, you don't have to worry about that! I'll show you how to add fast loading recent post widget on your blog.


You may have the recent post widget provided by blogger that you can add it using your feed URL. But, that was pretty slow. In fact, FeedBurner recent post widget is 100% working. You can see the done on this blog as well (On the right sidebar).

Actually, this widget is derived from FeedBurner which is very systematical and easy to install. Lets do that! Just follow the following steps to add feedburner recent post widget on your blog:


Adding Feedburner Recent Post Widget

1. Log on to your Feedburner account (Sign up here it you don't have already).

2. Click on the Publicize button on the top navigation bar,


3. On the left sidebar, click on the BuzzBoost.


4. Now, scroll down until you see the options to customize.


Check the options as your need. You can leave the options unchecked to make it looks perfect! But, you have to choose Number of links to display on the widget. Here I have choose 10 post to display.

5. Now click Save button (Below the options).

6. You can preview the widget as show below. And copy the code they provided.


7. Log on to your Blogger account. Go to Design > Page Element > Add a Gadget > HTML/JavaScript. And paste the code that you have copied on step 5.

Click to Enlarge


8. Save the widget and you're done!

I hope you like this widget. Now, you don't have to use other JavaScript codes or Feed URL to add recent post widget. Also, you can customize this widget as you have done in step 4. After customizing, you don't need to worry about the code that you have added on your blog (FeedBurner automatically arrange it).

Share your opinion how do you like this widget?

View This Article / Download>>

Tuesday, 7 September 2010

10 Tips for Marketing on LinkedIn

This is the guest post by James Adams who writes at cartridges.

LinkedIn has a stunning 75 million members. All types of people use LinkedIn as their resume network, from presidents and CEOs to production line workers. Are you using your LinkedIn network to market your products and services to the masses? Here are some tips for marketing your business on LinkedIn.

Also Read: 10 Best Social Network Sites for Business Professionals


1. Use your network - Connect with your former coworkers and colleagues through the LinkedIn network. The person who was the line worker yesterday may now be the CEO at one of your target businesses. Get in contact with your colleagues and peers, make introductions and use that network to your best advantage.

2. Join discussions - There is a group for nearly every conceivable purpose on LinkedIn. Search through LinkedIn to find discussion groups about your fields of expertise. Become an active participant in these groups and establish yourself as an expert. To be the most effective, you need to be an active participant within the group, so make sure that you can devote the time and effort to cultivating your company's reputation.

3. Create a group - After participating in some of the discussions, make a group of your own. Being an administrator allows you to create subgroups and start discussions. You can poll the members of your group about important breakthroughs within the field. You can make job postings for the other member. Ask your current contacts and employees to be part of the group to provide more exposure for your brand.

4. Personalize your profile - Create a personalized profile. Add pictures and share your interests with other LinkedIn users. People want to have a sense of connection to those with whom they do business. Be specific with your offered services, but make sure that you are warm and compassionate with your presentation. Add some flair.

5. Promote yourself - Market your LinkedIn profile to others by putting links on your other social networking sites. Put a link to your profile on your business cards and within your email signatures. Make a link in the 'about' section of your blog. You want to make yourself as accessible as possible within the social marketing sphere.

6. Be active - Having the LinkedIn account is not enough, you have to be active. Social networks are not instant, they take time to cultivate. Attract new people to your profile by giving them great blog posts, updating your content and providing value to your community.

7. Answer questions - There are questions which need to be answered and you are in the perfect position to offer your expertise to the situation. Let others see the depth and breadth of your knowledge. When you offer answers on LinkedIn, there is a link to your profile and your company. If you have recently blogged the answer to a question, feel free to put links to that blog post. When you are looking for goods and services, ask questions and you will receive new contacts.

8. Links - Encourage your employees to link to the company's group and webpage within their profiles. Each of these links increases the number of backlinks that you have, potentially lifting your company within the page rankings. You do not want to be bold and dramatic, you want to let others know about the services which you provide.

9. Request Recommendations - Take the time to request testimonials from your clients and your colleagues. These show up on your profile and can sway potential customers toward you. When you encourage recommendations, you are letting others have a voice about your products, services and reputation. Remember to give honest referrals for others in return.

10. Use Keywords - Keywords are important because they make you more visible in the search engines. Place the emphasis on the services that your company performs rather than the name of the company itself. When you are looking for a great internet marketer, you search for 'internet marketing,' rather than 'Joe's Services.' Pepper key words and phrases throughout your summary so that others know about your great products and services.

Also Read: 5 Business Grade Blogging Platforms
                 10 Tips for Using Twitter to Promote Your Site

When you use the LinkedIn social network, you are connecting with millions of others. Your answers are seen by millions, giving you free advertising. By including LinkedIn in your marketing strategy, you are significantly increasing your company's visibility.

View This Article / Download>>

Saturday, 4 September 2010

Sell Your Old Mobile Phones Online with SellMyMobile.com

There are more than 3 billion mobile phones that have been purchased in this world. Comparing it to world population, every 5 among 10 have owned mobile phone. But these are only the used phones and that are in networks. Have you ever imagined the damaged and un-repairable phones that are being stored under the bed and in the attic? After Motorolla invented the very first mobile phone, there have been several rises in mobile companies during these 20 decades.


Since mobile phones being electronic product, they don’t have long lasting life time. Talking about myself, I’ve 4 mobile phones which are damaged and unrepeatable one stored in my attic. If same is the case with you then you may either want to throw it away somewhere.


But why to throw it if you can make hard cash by recycling it. There are several companies who are purchasing the defective mobile phones from people just to recycle it’s parts. One of them is SellMyMobile.com. If you are searching for a right place to sell your old mobile phones, I recommend you to check SellMyMobile.Com. At Sell My Mobile you can sell your old, defective or unrepairable mobile phone to several mobile recycling companies.

Mobile phone contains several toxic chemicals which are harmful to Environment. If you are selling your old mobile phone instead of dumping it somewhere then, you are also saving the world environment. SellMyMobile.com sends the mobile phones purchased from you to the smelters, where professionals snatches out the precious parts from your sell phone to be added in newer ones.

Mobile phone recycling is a brand new concept of sending in any mobile phones that you have receiving money back for them. Whether your mobile phone is 10 years old or brand new, sellmymobile.com will be able to provide you the best price possible from our comprehensive comparison table.

SellMyMobile.com has easy and friendly user interface. For example, if you want to sell Nokia N97 then do the following:

1. Go to SellMyMobile.com

2. In the big search field type in your mobile brand and model name.


3. It will list the closer result with the price for working version of your phone and damaged version as well.


4. Choose the vendor you want to sell your mobile phone to.

Once you have found the ideal candidate to sell your phone with, you will be one step nearer to getting money for old phones. You will have to register with the recycler who will then provide all the details that you will need, and a cheque will wing its way to you in the post within a few days!

View This Article / Download>>

Friday, 3 September 2010

Releasing Platinum Blogger Template

Once again I'm back with one new magazine style Blogger Template named "Platinum". It look very professional and definitely suits on your blog. Platinum Blogger Template has many features that are most demanded by Blogger users. Thesis Blogger Template is also the greatest template that I've made. I guess you'll love it after viewing the Demo.

Download Platinum Blogger Template

View Demo

Download Platinum Blogger Template

 Times Downloaded

I converted Platinum WordPress theme into Blogger Template. Originally, Brian Gardner designed it and I converted it for all Blogger users and make it available for absolutely free.

Let see what I have added the cool feature on this template:

JQuery Drop Down Menu Bar


On the top of the page, it consists of awesome Drop down menu with JQuery effects. When you hover your mouse to these menus, it will drop soothly to downward direction.

JQuery Featured Post widget


With this widget, you can show the most featured post of your blog with image thumbnail and summary text. However, featured post widget is only visible on HomePage to make it look more professional.

Automatic Read More with Thumbnail


After you've written a post, you don't need to worry about the Jump links that blogger recently announced. Just you have to create a post a publish it! Your reader can easily view your post with attractive thumbnail on the left side and Ream More link on the right side.

Page Navigation


There was an error on the Blogger's default pager links. So, I installed Page Navigation hack for it to make it easy to turn the page of your blog easily.

There is many more missing that I cannot mention it here. In fact this template have more flexible where you can add more widgets on the right sidebar and there widget on the footer.

Customizations

Now, let's do some customization to fit it on your blog.

Top Menu Configuration

Find the following code on your template and replace URL(s) with your own.


Remove # and place your URL.

Featured Post

Go to Design > Page Element. You'll found the widget on the top named "Featured Post". Edit that widget and replace all URL and text with your own.

Note: You can remove that widget if it doesn't fits on your blog.

Logo

To change your own logo find the following code on your template and replace the image URL with your own logo URL,


Now finally, you are ready to use Platinum Blogger Template to your blog. If you have any problem regarding this template feel free to ask. You feedback is highly appreciated. You can share your opinion about this new wordpress converted Blogger Template. I hope you like this template.

We'll create more Blogger Template like this. Subscribe to this blog to get more awesome template direct to your inbox.

View This Article / Download>>